
Beef
Just what is dry-aged beef? Dry-aged beef has been stored for 14 to 21 days in a humidity and temperature-controlled environment. Dry aging allows moisture to evaporate and enzymes to break down some of the meat’s fibers. Dry aging intensifies the flavor and creates a tender texture that some describe as buttery or velvety. Only the most valued cuts are used to produce this special product. Dry-aged steaks may cook a little faster than the same non-dry aged-cut but the target doneness temperatures are the same.
Ground meat requires special handling. Whether it is beef, poultry, pork, lamb or veal, ground meat carries the greatest potential risk of food-bourne illness. It should be thoroughly cooked before eating because the grinding process introduces potentially harmful bacteria throughout the meat. The USDA recommends cooking ground meats to a internal temperature of at least 165° F for poultry and 160° F for meat.
One reason that beef raised without artificially stimulating growth hormones costs more is because it takes longer to raise. It takes approximately 20 to 24 months vs. about 16 months, which incurs more feed expense. You should look for grass-fed beef that has been raised on a vegetarian diet (not corn), not confined, pastured raised and no antibiotics or hormones added ever.
The best value beef cuts are: Ground Beef, Skirt Steak, Chuck Roast, Chuck Steak, Top Sirloin, Cube Steak, and Stew Meat.
Cooking Time Estimate For Roasting: Depending on the cut, should be about 20 minutes per pound at 350° F for medium.
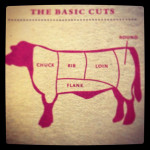
Best Cooking Methods For Steak:
Rib Steak (Rib) Grill & Pan-Fry
Filet Mignon (Loin) Broil, Grill, Pan-Fry, Sauté
Porterhouse (Loin) Broil, Grill, Pan-Fry
T-Bone (Loin) Broil, Grill, Pan-Fry, Sauté
Strip Steak (Loin) Broil, Grill, Pan-Fry, Sauté
Top Sirloin (Loin) Braise, Broil, Roast, Pan-Fry
Hanger (Flank) Braise, Broil, Grill, Pan-Fry
Flank (Flank) Braise, Grill
Skirt (Flank) Braise, Grill
Chuck Eye Steak (Chuck) Braise, Broil, Grill, Sauté, Stew
Flat Iron Steak (Chuck) Broil, Grill, Pan-Fry, Sauté
Bottom Round Steak (Round) Braise
Eye Round Steak (Round) Braise, Sauté
Beef Round Cube Steak (Round) Braise, Grill, Sauté
Top Round Steak (Round) Braise, Broil
London Broil (Varies) Braise, Broil, Grill, Roast
Best Cooking Methods For Beef Roasts & Smaller Cuts:
Rib Roast Bone-In (Rib) Roast
Rib Eye Roast (Rib) Grill, Roast
Tenderloin (Loin) Broil, Grill, Roast
Top Sirloin Roast (Loin) Roast
Tri-Tip Roast (Loin) Broil, Grill, Roast
Fresh Brisket (Plate) Braise, Stew
Flat Cut Corned Brisket (Plate) Braise
Shoulder Roast (Chuck) Braise, Stew
Chuck Roast (Chuck) Braise, Stew
Bottom Round Roast (Round) Braise, Roast, Stew
Eye Round Roast (Round) Braise, Roast, Stew
Sirloin Tip Roast (Round) Broil, Grill, Pan-Fry, Sauté
Short Ribs (Flank) Braise, Stew
Beef Kabobs (Variety) Broil, Grill, Sauté
Extra Lean Round Cubes (Round) Grill, Stew
Shank Bone-In (Round) Braise, Stew
Beef Liver Slices (Variety) Sauté
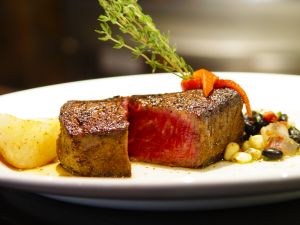
Target Temperatures:
The USDA recommends cooking all whole muscle cuts of beef to at least these internal temperatures to ensure that potentially harmful bacteria are destroyed. Some people may choose to cook their meat to lower temperatures, depending on preference. Ground beef should be cooked to 160° F.
Desired Doneness: Medium Target Temp: 145° F
Texture: Warm/Firm Center Color: Light Pink
Desired Doneness: Medium Well Target Temp: 155° F
Texture: Very Warm/Firm Center Color: Gray, Tinged With Pink
Desired Doneness: Well Done Target Temp: 165° F
Texture: Hot/Dense/Hard Center Color: Grayish Tan
Residual Heat: Residual heat continues to cook meat after you’ve taken it off the grill or out of the oven or pan. It’s important to factor this rise in temperature into your timing and remove the meat from the heat before hitting the target temperatures above – an average of 5° for steaks up to 15° for large roasts.
Basics of Meat & Poultry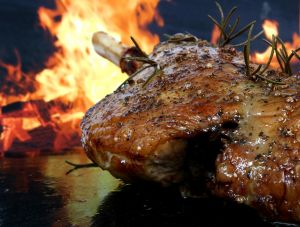
Many people ask me how long they can keep fresh meat and poultry. You can refrigerate whole meat cuts for 2 to 3 days and raw ground meats for 1 to 2 days. Raw poultry for 1 to 2 days. If you’re not cooking your meat or poultry within these time frames, freeze it. We never want to risk getting food poisoning.
How do you know when your particular meat is done cooking? The safest way is to use a meat thermometer, inserting into the thickest part of the meat, but never touching bone.
Meat Cooking Terms
Braise: Moist cooking in a pot with a lid and a small amount of liquid. This method works well either on the stove top or in the oven, rendering tougher cuts moist and extremely tender by melting the tough collagen between fibers, but allowing the fibers themselves to retain moisture. Examples: Pot Roast, Boeuf Bourguignon, Cacciatore, Most Curries.
Brine: Similar to marinating, meat or poultry is soaked in a salt-water mixture prior to cooking to enhance flavor, moisture and tenderness. Examples: Brined Turkey, Chicken or Pork.
Broil: Dry cooking under intense direct heat, sort of like grilling from the top down. Great for tender steaks and chops, boneless chicken, kabobs. Example: London Broil.
Deep Fry: Cooking pieces of meat, often coated with batter or crumbs, submerged in very hot oil. Example: Southern Fried Chicken.
Grill: Cooking over direct heat, usually outdoors. Grill pans and electric grills don’t require much additional oil, and create nice looking char marks, but lack the crust and smoky flavor of outdoor grilling. Grilling can be fast or slow. Examples: Grilled Steaks, Barbecued Chicken, You Name It!
Pan-Roast or Pan-Fry: A technique that begins on the stove top and often ends under the broiler or in the oven. Combination cooking creates a flavorful browned exterior and allows for finer control of doneness. Great for thick chops and steaks or larger pieces of poultry. Examples: Filet Mignon, Pork Tenderloin, Pan-Roasted Veal Chops.
Poach: Simmer at a point less than boiling to produce just a slight movement in the liquid. Examples: Poached Chicken Breasts.
Roast: Dry cooking in ambient oven heat. Creates a flavorful, browned outside and a tender, juicy interior. Ideal for larger tender roasts, whole poultry, most stuffed roasts. Examples: Roast Beef, Thanksgiving Turkey, Crown Roast.
Sauté: Quick stove-top cooking in a skim of oil in a heavy, low-sided skillet, frying pan or sauté pan. Great for tender steakhouse cuts and chops, chicken or duck breast, boneless cutlets. Examples: Sandwich Steaks, Wiener Schnitzel, Chicken Cutlets.
Smoke: Food is cooked or flavored before cooking by exposure to smoldering wood, herbs or tea. Examples: Tea-Smoked Chicken, Mesquite-Smoked Pork Chops.
Stir Fry: An Asian technique of cooking small pieces of food over very high heat, usually with oil, using constant stirring and tossing motion to prevent burning. Examples: A Profusion of Meat, Seafood and Poultry Dishes From China, Thailand and Vietnam.
Simmer: See Braise & Also See Stew
Stew: Slow cooking, Submerged in flavorful liquid, usually after browning on the surface. Stewing is similar to braising except that stews usually have more liquid, which is an important part of the finished dish. Best for cubes coming from tougher cuts. Examples: Beef Stew, Chili, Gumbo.
Sous-vide: A method of cooking food sealed in airtight plastic bags in a water bath for longer than normal cooking times (72 hours in some cases). The temperature is regulated and much lower than normally used for cooking, typically around 55° F to 60° F for meats. The intention is to cook the item evenly, and not to overcook the outside while still keeping the inside at the same doneness, keeping the food juicier. Examples: Beef Brisket and Short Ribs.


Knives
Whenever you have finished using a knife, you should hone, or sharpen, it briefly with a honing steel before you put it away. The steel, which is a long, metal rod, actually shaves off the tiniest bit of metal to improve the edge. Every 6 months or so, most knives should be sharpened either by a professional or with an at-home mechanical or manual sharpener (such as a sharpening stone).
Knife Set Essentials
Beyond the essentials, build your collection of knives based on the kind of cooking you like to do. If you roast meat a lot, then a carving knife may be more necessary than a thin-bladed vegetable cleaver.
Start With
8 Inch Chef’s Knife
3 1/2 Inch Paring Knife
9 Inch Serrated Bread Knife
Add
10 Inch Chef’s Knife
5 1/2 Inch Santoku (Metal or Ceramic)
Kitchen Shears
Nice To Have
Boning Knife
9 Inch Carving Knife
Thin-Bladed Vegetable Cleaver
Serrated Tomato Knife
4 Inch Paring Knife
The edge of a knife is made at a 20-degree angle. So, to properly hone a knife, hold the knife at a 20-degree angle to the steel and run each side of the cutting edge across and along the steel three or four times.
If you don’t have a honing steel handy, you can use a ceramic plate or mug. Turn the plate over and draw the knife along the edge of the unglazed bottom ring, holding the blade at a steady 20-degree angle. The ring of the plate will turn gray, but it will clean up with the wipe of a moist sponge.
When knives are stored in a wooden knife block, the blades are hidden, which can make it difficult to identify knives that have similar handles. To help distinguish one knife from another, use red or white nail polish to mark the heel of each knife with an initial, i.e., C for carving, S for serrated, or U for utility.

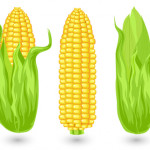
 Corn Basics
Fresh sweet corn is one of life’s pleasures indeed. While corn is available all year-round here in America its true peak season is July through September. This is when corn is at its best.
Buying Tips: Buy ears that are firm and well-shaped under fresh-looking husks with shiny, moist milk. Unshucked corn stays fresh longer. Pick ears that look plump, with kernels running to the tops of the ears. Tiny kernels indicate immaturity, but very large deep yellow kernels can be chewy. The fresher the corn, the sweeter the kernels. With age, the sugar in corn converts to starch. Frozen and canned corn kernels are good substitutes for fresh. Canned baby corn is used in Asian stir-fries. One medium ear of corn yields about 1/2 cup of corn kernels.
Storing: Cook and eat corn as soon as possible after picking. If you must, refrigerate in the crisper drawer up to one or two days.
Preparing: Shuck the corn and remove the silk just before cooking. An exception is corn grilled with the husks intact. To remove the kernels, trim the tips so you can stand the ear on end, then slice down to cut off the kernels, cutting close to the cob.
Cooking: Corn is one of the most versatile vegetables. Sauté the kernels alone or with other vegetables; stir into puddings, fritters, or other batters; or roast, microwave, or boil on the cob. To boil, in a large saucepot, heat 3 inches of water to boiling over a high heat; add the shucked corn and heat to boiling. Do not add salt as it toughens the corn. Reduce the heat to low. Cover and simmer for 5 minutes. Drain.

 Balsamic Vinegar
In Italy, true balsamic vinegar is not considered an acidic ingredient for salad dressings, but rather a condiment to sprinkle on grilled meats or the best strawberries of the season. There are three very different kinds available: aceto balsamico tradizionale, commercial, and condiment.
Aceto balsamico tradizionale, or “traditional balsamic vinegar,” is made in small quantities under rigorously controlled conditions in and around the towns of Modena and Reggio Emilia in Emilia-Romagna. This artisanal product is protected by Italian law and by the European Union’s designation of original standards. Created from the boiled-down juice of sweet white grapes (traditionally Trebbiano), it has an underlying sweetness and takes on additional complex flavors from sequential aging in chestnut, oak, and other wood barrels. The long aging further evaporates the liquid, giving it a slightly viscous body. The name comes from balsanum, Latin for an aromatic resin that soothes and relaxes (the English balm is from the same word), indicating that the condiment was originally considered healthful and even used as medicine. Tradizionale must age for 12 year, so it is always expensive, but worth every penny.
Mass-market commercial balsamic vinegar, which is made from artificially flavored red wine and is not aged, is sometimes labeled “balsamic vinegar of Modena.” To improve its flavor and body, add a large pinch of brown sugar for every cup of vinegar.
Condimento balsamic vinegar is often good, and can be a fine alternative to commercial balsamic of questionable quality and the excellent but expensive tradizionale. It is usually made in Modena or Reggio Emilia, and often follows many of the same traditional manufacturing methods as its pricey relative. But unlike aceto balsamico tradizionale, condiment is not protected by a determined set of standards, so big differences can exist among brands. When you find one you like, stick with it.
Many chefs use a drizzle of boiled-down balsamic vinegar to decorate plates and act as an additional flavoring element. To make this useful garnish, boil 1 cup commercial balsamic vinegar in a nonreactive saucepan over a high heat until it has reduced by about three-fourths and is thickened and syrupy. It will keep indefinitely stored in a tightly closed jar at room temperature.
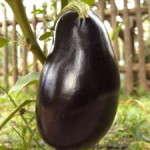
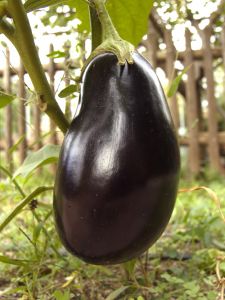 Eggplant Essentials
Eggplant (also known as Aubergine or Melongene) is an egg-shaped vegetable with a typically dark purple, shiny skin, though some are yellow or white. Eggplant was so named because the delicate white varieties that resemble eggs. Eggplant grows on a plant (Solanum Esculentum) in the nightshade family and is actually a fruit and not a vegetable. It is actually technically a berry. Eggplants have not always been popular. They were once known as “mad apples,” because it was thought that they caused insanity or death. They have been used in China since 600 BC. Thomas Jefferson first brought the eggplant to America from France in the eighteenth century. Male eggplants are rounder and smoother at the blossom end. They have fewer seeds which are bitter. Female eggplants are more oval and the blossom end is usually deeply indented. They tend to have more bitter seeds.
Eggplants are at their best from July through September. Select smooth, firm, glossy-skinned eggplants with green caps and stems. Smaller eggplants are sweeter than large ones. The fewer the seeds in an eggplant, the sweeter the eggplant. The more seeds in an eggplant, the older the eggplant.
Store eggplants in perforated plastic bags in the vegetable crisper of the refrigerator for four to five days.
Eggplants should be cooked immediately after peeling or cutting because the exposed flesh discolors rapidly due to oxidation. To prevent this start cooking as soon as you have cut it. If there is an unavoidable delay, promptly coat the surface with lemon juice or submerge with pieces in acidulated water.
Salt the flesh of a large cut-up eggplant to draw out any bitterness. For frying, it is always good to salt the eggplant or otherwise remove excess moisture. Only eggplants with tough, thick skins need to be peeled.
Eggplants should be cooked in only the minimum amount of fat or oil or without any at all because they have inner air pockets. Eggplants can absorb several times their weight in oil, even when breaded. Cooking with too much oil or fat breaks down the eggplant’s texture.
Slicing eggplants is so much easier when using a serrated knife.
 Sautéing Tips
Some foods need moist, long cooking to tenderize them while others just require a quick sauté in a skillet. Sauté means “jump” in French which describes the tossing and turning in the skillet during the cooking process. There are a few basic secrets to perfect sautéing that will help you get better cooking results.
The trick to successful sautéing is to use a medium-high heat and a small amount of oil. As a matter of fact meats and other protein-based foods should not be turned too often because extended contact with the hot skillet will brown the surface of the food which will deliver extra flavor. Heat the skillet over a medium-high heat and if the pan is too hot you will burn the outside of the food before the inside is cooked so turn down the heat a bit.
Do not use butter for sautéing. Use oil. Butter contains milk solids that burn and smoke at high temperatures. Some cookbooks call for mixing butter and oil which supposedly increases the smoke point of the butter. This does not remove the milk solids that are the problem. You can, however, use clarified butter, but it is easier to use oil for cooking meats. If you want a butter flavor then use it in a pan sauce.
Thick cuts of meat can be difficult to cook through when sautéing. You may want to use a double-cooking method for thick cuts. Double-cut pork and lamb chops, porterhouse steaks, and large bone-in, skin-on chicken breast halves are too thick to cook through in a skillet on the stove top. It is best to brown them in the skillet, and then finish cooking them in a 400° F oven. Be sure that your skillet is ovenproof.
Make a pan sauce to take advantage of the browned bits in the pan which are loaded with delicious flavor. Remove the meat from the skillet and tent loosely with aluminum foil to keep the meat warm. Pour off the fat from the skillet and return the skillet to the medium-high heat. Add a couple of tablespoons of minced shallots and a tablespoon of butter. Do not add the butter alone as the skillet may be too hot and the butter will burn. The shallots will act as insulation. Cook for a minute or so to soften the shallots and then add about 1 cup of an appropriate stock. Wine may seem like a good choice, but it can be too strong. Boil the stock, scraping up the bits in the pan with a wooden spoon or spatula until it is reduced to about 1/2 cup. Remove from the heat and whisk in 1to 2 tablespoons of cold butter (a tablespoon at a time) to thicken the sauce lightly.

 A Word About Eggs
Do not transfer your eggs to the egg holder in the refrigerator door. This is actually the warmest place in the fridge and storing them there will hasten spoilage. Leave them in their carton and put them on a shelf.
There is no difference in flavor or nutritional value between white and brown eggs. Choosing one over the other is a matter of aesthetic preference. The breed of chicken determines the color of the eggshell.
To crack an egg with a clean break, rap it on a flat work surface. Eggs that are cracked on the edge of a bowl shatter more easily and you can end up with pieces of eggshell in the bowl.
Eggs are much easier to separate when they are cold. Most chefs learn to separate eggs by passing their contents back and for between halved shells, but this is not the greatest method as the sharp shells can cut into the yolk. It’s much better to use your hands. Working over a bowl, hold the egg in one hand and rap the egg on the work surface. Still using one hand crack the egg into your other cupped free hand. With practice you will soon be able to crack and open an egg with just one hand. Throw away the shell. Gently pass the egg back and forth to your cupped hands. Let the white slip through your fingers into the bowl while the yolk remains intact. Make sure to wash your hands well before starting this process and, of course, after you’ve separated the last egg.
Room temperature eggs will beat more easily because they will incorporate more air than cold eggs. To take the chill off of refrigerated eggs put the uncracked egg in a heatproof bowl and then add hot tap water to cover. Let stand for about 5 minutes.
To bring egg whites to room temperature, separate the cold eggs. Open them over a heatproof bowl so that the whites fall into it. Put the bowl in a larger bowl filled with hot tap water and let stand. Stir occasionally for about 3 minutes or just until the whites lose their chill.
Fat inhibits the aerations of egg whites. When you are beating egg whites make sure that there is not ANY fat that comes in contact with the whites. Bowls and beaters must be absolutely clean. Do not use a plastic or rubber bowl for beating egg whites because they seem to retain grease. To make sure that you have removed all grease from the bowls and beaters put the beaters in the bowl and add a generous splash of vinegar. Wipe out the bowl with paper towels and then wipe down the beaters with the vinegar soaked paper towels. Pour out any vinegar that may remain in the bowl, but do not rinse out the vinegar residue. Due to its acidity, vinegar will react with the egg whites and help them hold their shape when whipped.
For soft scrambled eggs, add a spoonful of heavy cream or milk when you beat the eggs. This should be about 1 tablespoon for every 2 eggs. Salt does toughen the eggs so don’t add the salt until after the eggs are cooked.
Poached eggs should have an attractive oval shape. First, use very fresh eggs, as their whites are firmer than older eggs. Regardless of age, it isn’t easy to get the whites to behave in simmering cooking water. Vinegar and salt will help set and control the spreading whites. Add 1 tablespoon of cider or distilled vinegar and 1/2 teaspoon of kosher salt to every quart of water. When the eggs are done, use a slotted spoon to transfer them to a bowl of hot tap water to rinse off the vinegar flavor and to hold the eggs for a few minutes before serving.
Hard-boiled eggs should be easy to cook. There are two common problems in cooking hard-boiled eggs. 1. Green-ringed yolks 2.Difficulty peeling. First, you should use eggs that have been stored for 7 to 10 days before cooking them. Older eggs are easier to peel. As the egg ages, carbon dioxide escapes through the shell, reducing the acidity of the white and acidity affects how the white clings to the shell. For peeling I find it easier to peel a hard-boiled eggs under running water.
Despite common belief, hard-boiled eggs should not be boiled for two reasons. First of all, the bubbling water can move the eggs so much that the shells crack. Second, it is easy to overcook eggs in boiling water. Overcooking will cause that horrible green ring that sometimes forms around the yolk. A better and easier way to cook the eggs is by putting them in a saucepan and cover with cold water. Bring to a simmer over a high heat. Take the pan off of the heat and cover with a lid. Let the egg stand in the water for 15 minutes. Pour off most of the water from the saucepan and then fill the pan with cold water. Let the eggs stand until they are completely cooled which should be for about 20 minutes. Crack and peel the eggs (under running water) immediately after cooling.
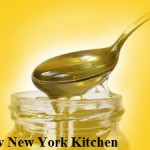
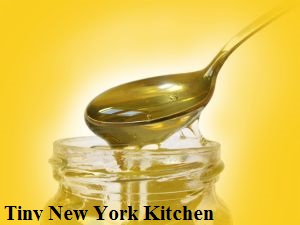 Storing Honey
Did you know that you can keep your honey from crystallizing by storing it in the freezer? You don’t have to worry about it freezing solid because the moisture content is low. When purchasing large amounts of honey, divide it into freezer proof containers and freeze. When you need to use it just defrost it at room temperature for about 1/2 hour. The honey will appear thick and a bit sludge-like until if fully reaches room temperature.

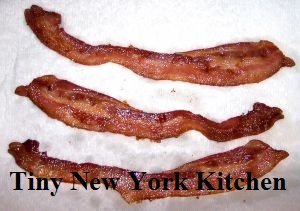
 A Few Words About Bacon
Bacon is salted, dried, cured or smoked meat from the back or sides of a pig. The term is derived from the Germanic bache/backe “back meat,” though at first the word referred to any part of a pig. Flitch (or slab bacon) designates a whole chunk of bacon before it is cut into slices. Burned bacon can be dangerous because burning it will produce carcinogens.
If you’re not doing it already then I have 3 words for you…BAKE YOUR BACON! Frying is the traditional way to cook bacon, but as we all know the high heat can make the bacon fat splatter all over the place. Baking applies lower heat, reducing splattering and shrinkage. It is also the best way to cook large amounts of bacon. Arrange the bacon slices side by side on a large, parchment paper lined, baking sheet. It’s a good idea if the baking sheet has a large rim on it. Bake in a preheated oven at 400º F for about 20 minutes or until the bacon is crisp and browned. Cooking food in the oven at this temperature is actually roasting, but there are times when the terms roasting and baking can be used interchangeably. Remove the rendered fat as it accumulates with a bulb baster, if necessary. When done it’s a good idea to transfer the bacon to paper towels to drain.
Generally bacon is about 50% fat. As it cooks, the fat becomes liquid and separates from the meat. This process is called rendering. The rendered fat can be put in a tightly covered container and stored in the fridge or freezer for sautéing or frying other foods.
Purchasing the leanest bacon can be counterproductive, as the fat gives the bacon most of its desirable flavor and crispness. Most of the extra fat melts off during cooking. The fat on bacon should be about 1/2 to 1/3 of the total weight. If you buy bacon from a butcher, you can ask for the rind to be removed and for the bacon to be sliced. A whole slab stays fresher longer. A butcher-cut slab can be stored for two weeks in the fridge or two months in the freezer. The freezing does create ice crystals which causes the bacon to splatter when fried stovetop.
Did you know that bacon can be frozen for up to 4 weeks? The curing process affects the stability of the fat, which means that bacon can turn rancid even when frozen. Although you can freeze the unopened package, it is usually better to separate the slices into conveniently sized amounts (about 4 ounces or so for breakfast). Wrap the bacon tightly in plastic wrap, then overwrap with aluminum foil. For added protection place in a ziplock bag. Long-term freezing is not recommended. Thaw thoroughly in the fridge before cooking.
Once the vacuum pack is opened, bacon will usually keep for only about a week in the fridge, although sometimes it will keep for a couple of weeks. The ends may darken and dry out and they should be sliced off and thrown away before using. To make bacon crumbles, chop the bacon first and then cook it.
Keep Calm and Eat Bacon!