
Heart healthy beets are packed with nutrients and are perfect for late winter meals. You will love them for their vibrant color, sweet flavor, and versatility.
There are just 60 calories in 1 cup of beets. While low calorie, beets are also packed with potassium, iron, vitamin C, and heart healthy nitrates. The greens are rich in vitamins A and K. Try using beets in soups and sautés.
While red beets are the most common variety, other varieties of beets do exist. Golden beets, as their name implies, are a golden yellow color. Chioggia beets contain red and white stripes on the inside, which is why they are often referred to by their nickname – candy cane beets.
To store fresh beets, separate the leaves from the root and place in separate plastic bags in the refrigerator. The greens should be used within a few days while the roots can last up to two to three weeks.
To peel uncooked beets, use a vegetable peeler to remove the thin skin. For roasted beets, use a paper towel to gently rub off the skins. This gives you a better grip and helps keep beet juice from staining your hands.
Beet juice has been used as far back as the 16th century for makeup, hair dye, and fabric dye. It’s still used commercially as a natural food coloring and clothing dye.
To remove beet juice stains from your cutting board, sprinkle with salt and rub with a lemon half before rinsing. You can remove stains from your hands by rubbing them with a little baking soda, then washing with soap.
Beets are high in nitrates, natural compounds that may help lower your blood pressure and help your body use oxygen more efficiently. Many pro athletes and Olympians drink beet juice to improve their performance.
Beets get their deep red color from compounds called betalains, which have strong antioxidant and anti-inflammatory properties.
37% of the recommended daily intake of folate for adults is in 1 cup of raw beets. Folate needs increase during pregnancy, as this vitamin helps babies develop in the womb, making beets a great addition to a pregnant woman’s diet.
©Tiny New York Kitchen © 2021 All Rights Reserved
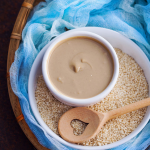
Tahini, a roasted sesame seed paste, is the key ingredient in hummus recipes, but you can also use tahini these ways:
Nut-Free Peanut Sauce
Combine with soy sauce, lime juice, brown sugar, and crushed red pepper. Check labels to be certain that your tahini is nut-free.
Veggie Burgers
Add a spoonful to help bind bean or lentil burger mixture together instead of using an egg.
Oatmeal
Drizzle over a bowl of oatmeal topped with sliced bananas, a dollop of yogurt, and maple syrup.
Dressing
Stir together with lemon juice, olive oil, and minced garlic as a dressing for salads or grain bowls.
Brownies
Swirl into a pan of brownie batter before baking to balance the sweetness of the chocolate.
©Tiny New York Kitchen © 2021 All Rights Reserved
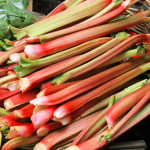
Rhubarb is a fabulous spring crop. The sour sweetness of rhubarb is absolutely nice in cakes, breads, pies, cobblers and jams, as well as sweet and savory compotes, chutneys, and sauces. Savory rhubarb chutney, cooked with onions and hot pepper is an exciting accompaniment to grilled pork, chicken, or shrimp. Sweeter versions employing brown sugar and lemon peel are superb served with pancakes, French toast, waffles or pound cake. Ladled atop frozen yogurt or ice cream, sweet rhubarb sauce is perfect for a spring sundae when the sun burns bright. This same sauce can be strained to yield a perfectly pink syrup. Combine with cold sparkling water or seltzer for a refreshing mocktail, or add to prosecco for a beautiful brunch beverage.
Rich in fiber, protein, vitamin C, potassium and calcium, rhubarb provides many valuable nutrients. A natural laxative, rhubarb may help east constipation. In fact, it is written that rhubarb was utilized in ancient Chinese medicine for treating stomach ailments. The vitamin K found in rhubarb may help strengthen bones, as well as possibly inhibiting inflammation in the brain. Rhubarb also supplies the body with vitamin A, which may help diminish signs of aging, particularly skin damage.
When choosing rhubarb at the supermarket or farm markets, look for glossy, firm stalks. Trim the leaves off when you bring your rhubarb home, as they are toxic. Store the stalks wrapped in a paper towel in your vegetable drawer. Wash before using. Rhubarb freezes beautifully, place chopped stalks on a parchment paper lined baking sheet and place in the freezer. When the chunks are frozen, store them in freezer bags and use within one year.
“Work With What You Got!”
©Tiny New York Kitchen © 2020 All Rights Reserved
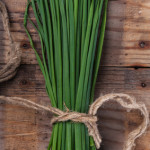
As gardens begin to grow, one of the first perennial herbs to appear are chives. Chives are quite resilient and are particularly easy to grow both in garden beds or in pots. They can stand a bit of shade, tolerate drought, and grow well in any type of garden soil. For first time gardeners, this is an excellent plant that will yield a reliable source of flavorful nutrition.
Chives belong to the lily family and are part of a large genus of over 500 species of perennials that contain bulbs or underground stems. Known for their strong scent and distinct flavor, chives, along with garlic, onions, scallions and leeks are known as allium herbs. Allium species have been cultivated around the world for centuries and are valued both medicinally ad for their fabulous flavor.
If you grow your own chives, you can continually cut them back so the crop will continue into early fall. If you let happen to let them go you will get lovely purple-pink globe shaped chive flowers that make a beautiful garnish as well as a bright addition to spring or summer salads.
Chives are best when used fresh. Rinse and dry them well, then snip with scissors or cut with a very sharp knife. Snipped chives can be placed in freezer bags and frozen for later use, but will not maintain the texture of fresh shoots.
This is an herb that will elevate so many dishes, including soups, stews, salads, sauces, marinades, dressings, and dips. Adding a few tablespoons of chopped chives to cottage cheese will add a pleasing punch to a super simple snack. Make an easy supper of baked potatoes or sweet potatoes topped with Greek yogurt and chives. Mixing chives into cream cheese, along with lemon zest, and a grinding of black pepper will make an excellent spread for sandwiches or crackers. Omelets prepared with chives, parsley, and dill are a nice choice for any meal.
Chives contain valuable vitamin and mineral content. Vitamins K, A, and C are found in chives, as well as calcium, an important mineral. Chives also contain small amounts of magnesium, phosphorus, potassium, and sodium. Purported to be anti-inflammatory, antibacterial and antiviral, eating more chives may boost your immune system and assist in maintaining superior levels of health.
If you buy your own chives at the grocery store, look for a bright green color with no sign of yellowing or wilting. Chives will keep in the crisper drawer of the refrigerator for several days. Before using, rinse and dry well and trim the ends before using.
Enjoy this light and bright spring herb.
“Work With What You Got!”
©Tiny New York Kitchen © 2020 All Rights Reserved

Nothing compares to crisp and juicy in-season apples, and now is the perfect time to make the most of them in both sweet and savory dishes.
Pick Like A Pro
When shopping, avoid apples with nicks, bruises, or soft spots and seek out fruit that’s firm and heavy for its size. Make sure the skin is smooth and shiny, as dull skin is often a sign that apples are lacking in taste and texture.
Keep Cold
Apples lose their crispness at room temperature, so be sure to store them in the refrigerator, where they’ll keep for up to three weeks. Separate soft or bruised apples, which can cause perfectly good ones to soften more quickly.
Know The Benefits
Apples are more than just a low-calorie snack. They’re also packed with fiber, which has been shown to reduce the risk of some cancers, as well as heart disease. Plus, fiber keeps tummies feeling full, so you’re less apt to reach for sugary treats.
Apples Love Lemons
A squeeze of lemon juice helps keep cut-up apples from browning.
www.tinynewyorkkitchen.com
“Work With What You Got!”
©Tiny New York Kitchen © 2018 All Rights Reserved

Pulling a tender, juicy roast chicken with crisp, golden brown skin out of the oven is so rewarding. For a simple side, roast a pan of in-season produce like spring onions, ramps, new potatoes or carrots during the last 20 minutes of cooking.
INGREDIENTS
1 Whole Chicken (4 Pound)
1 Teaspoon Sea Salt
1/2 Teaspoon Freshly Ground Pepper
Preheat oven to 425 degrees.
Remove neck and giblets from chicken. Trim off any excess fat from neck and tail end of chicken. Rinse bird with cool running water. Pat dry with paper towels, and season all over with salt and pepper.
Place chicken, breast side up, on a rack in a small-size roasting pan or a 9×13 inch-baking dish. Tuck wings back and behind bird to hold them in place. Roast, basting once or twice with pan juices, until skin is deep golden brown and juices run clear, about 1 1/2 hours.
An instant-read thermometer inserted in the thickest part of the thigh should read 165 degrees. Let chicken rest for 15 minutes and then carve.
To add fragrant flavor, stuff the cavity with a halved lemon or orange and a handful of fresh herbs like rosemary, thyme, and oregano.
Serve with an easy salad of greens topped with cherry tomatoes, mozzarella, and a drizzle of olive oil.
Serves 4
Prep Time: 20 Minutes
Cook Time: 90 Minutes
Total Time: 110 Minutes
“Work With What You Got!”
©Tiny New York Kitchen © 2018 All Rights Reserved

Going out for dinner on Valentine’s Day is a risky affair. Even the best restaurants can have “overload difficulties” on such a busy night where couples have expectations of restaurant perfection. A better way to manage expectations is to take control of them yourself. Food is a language of love. You know what you like and what your loved one likes. No need to worry about cheesy love songs or a perfumed soaked lady sitting next to you. Nothing says I love you more than taking the time to make a special meal for the person you love. Visit the local farmers’ market, butcher, or seafood shop to buy their favorite seasonal ingredients. Come up with a meal that celebrates love. Turn off the lights, fire up all the candles and put on your favorite music.
Keep it easy and made make it special. Plan out the meal from beginning to end to get organized and make sure you have a solid menu. If you’re not a seasoned cook make sure to keep it simple and I recommend not trying to make complicated dishes that you’ve never made before. Make it easy with three courses. Begin with a beautiful cheese plate. Embrace easy, big impact dishes. Start off with prosciutto-wrapped scallops finished with a squeeze of lemon. Warm things up with braised short ribs or steaks finished off with butter and herbs. Keep desserts simple, but sweet. Decorate bakery cakes with fresh fruit or edible flowers or warm up slices of pie and top with caramel sauce and a gourmet ice cream or try your hand at an easy dessert of chocolate pots de crème. Don’t forget that nice bottle of wine or champagne.
“Work With What You Got!”
©Tiny New York Kitchen © 2018 All Rights Reserved

Oranges and lemons were first brought to the Americas by Spanish explorers. Today the United States is among the world’s top citrus growers and consumers. To choose the best citrus select fruit that is heavy and not too soft. When selecting oranges don’t worry about the color, as it is not a good indicator of how tasty the orange will be. For lemons and limes the juiciest fruit gives a little when you gently squeeze them. I like to roll lemons and limes around on the counter with the palm of my hand to loosen up the juice before cutting into them.
Oranges, grapefruits, lemons, and limes are the most commonly found citrus fruits. Lemons, limes, and oranges come into season just when we need them the most, when days are short and the weather is cold. Rich in vitamin C and fiber, they add a zesty boost to almost any meal. During the winter months, look for other varieties, such as blood oranges, Key limes, and Meyer lemons, as well as grapefruit-like pomelos and tiny kumquats.
We need vitamin C to stay healthy and citrus fruit is a delicious way to add lots of this vital nutrient to your diet. Start the day with orange juice, add a squeeze of lemon to warm water later in the day, or pack grapefruit sections to enjoy as a snack at work or school.
Citrus stars in everything from sweet and savory dishes to non-food uses. Simmer slices of lemons, limes, and oranges in water to use as a natural air freshener, use lemon juice as a gentle alternative to laundry bleach, or combine lemon juice with olive oil to use as furniture polish.
Much of the citrus flavor is in the zest. Finely grate the peel and add to anything that needs a punch of citrus flavor. To get perfectly grated zest without bitter white pith, use a fine zester.
Make your own flavored salt by processing coarse salt, freshly ground black pepper, and citrus zest in a food processor. Add this mix to soups, stews, meats and pasta dishes.
Use a vegetable peeler to remove large strips of peel and add to hot tea, mulled wine, soups, and stews to add bold flavor.
To segment citrus like a pro cut a thin slice from either end of the fruit to make a base. Pare away the peel and white part of the rind. Cut into the fruit center between one section and the membrane. Cut along the other side, between section and membrane. Repeat.
www.tinynewyorkkitchen.com
“Work With What You Got!”
© Victoria Hart Glavin Tiny New York Kitchen © 2017 All Rights Reserved

The turkey came originally from America and was first domesticated by the Aztecs in Mexico. The Spanish introduced turkeys into Europe and they soon became a popular choice in France, Italy and Britain.
When early settlers from Britain, France and Holland crossed the Atlantic to North America, the vast flocks of turkey that roamed wild provided them with sustenance. They were plentiful and so easy to trap or shoot that the older children of the family were given the responsibility of catching them. The Native Americans meanwhile taught the new settlers the rudiments of farming, and in November 1621, on the first anniversary of their arrival, the Pilgrims entertained the locals to a feast, at the center of which was the turkey. Ever since, this has been the traditional bird served at Thanksgiving.
Turkeys are available fresh, chilled, or frozen all year round. When buying a whole bird, look for a plump well-rounded breast and legs and clear, soft and evenly colored skin. Avoid birds that are bruised, with blemishes or torn skin or any that have been badly or unevenly plucked. Turkeys vary enormously in weight.
When you’re ready to purchase your turkey it’s easy to get confused on what size to get. A good guild to go by is to figure approximately 1 1/4 pounds per person. This makes enough for the meal and provides a decent amount of leftovers.
To store your turkey place it in a large, deep dish and cover it completely with plastic wrap. Store it in the coolest part of the refrigerator; making sure that it does not come in contact with other foods.
Thaw a frozen turkey in the refrigerator for 2 to 4 days. Estimate 24 hours for every 5 pounds, so 2 days for a 10 pounder, 3 days for a 15 pounder, etc.
And then there is always the frozen turkey emergency that goes like this, “Help, help, it’s Wednesday, and my turkey is still frozen!!!” It’s been a long time, but I’ve been in this predicament. What you do is leave the turkey in its wrapper and put it in a large-size container. A lobster pot works well. Fill the container with cold tap water and let it sit for 30 minutes. Dump out the water and refill. Let it sit another 30 minutes. Repeat until the turkey is thawed, then roast immediately or transfer to the refrigerator.
The good news is that you can brine or dry cure your turkey while it defrosts in the refrigerator. What a Godsend that is! Use a lighter brine solution, which is about 1/2 cup kosher salt per gallon of water, plus sugar and spices). If you’re dry curing, use the standard recipe. You’re turkey should stay below 40 degrees while brining. You don’t need to brine or cure a kosher or butterball type supermarket frozen turkey. These come pre-brined. If you want to be able to put your own flavor stamp on your meal, then get a natural or untreated bird and do it yourself. If you plan on brining for 2 days use the weaker solution that I just mentioned. If you plan to brine for 24 hours or less, then bump it up to 1 cup kosher salt per gallon of water. Then add an equal amount of sugar. I don’t always brine, but when I do I’ve been known to throw an assortment of flavorings in the brine. Flavorings that you could add to your brine could be: apples, lemons, oranges, onions, garlic, shallots, peppercorns, bay leaves, cinnamon sticks, cloves, allspice berries, juniper berries, mustard seeds, fennel seeds, coriander seeds, rosemary, sage, thyme, savory, parsley, or oregano. You can also replace half the water with sweet cider, hard cider, vegetable stock, turkey stock, chicken stock, beer, white wine, or red wine. If you want to dry cure then use about 1/2 teaspoon kosher salt for every pound of turkey. Then add spices to your taste.
Stuffing your turkey is a personal preference. I always stuff the bird because I love how it tastes when cooked inside the turkey. It does slow down the cooking process, however. Never stuff the turkey in advance of cooking. The stuffing can be made in advance, but the turkey should not be stuffed until just before it is placed in the oven. Weigh the stuffing and add this to the weight of the bird before calculating the cooking time. Thoroughly rinse the body cavity of the bird under cold running water, and then drain it well. Wipe the turkey, inside and out, with paper towels. Press the stuffing inside the shallow neck cavity. Make sure not to pack it in too tightly. Turn the bird over and pull the neck skin over the stuffing. Now it’s time for a little turkey bondage and truss the bird (tuck the wing tips under the breast and tie the legs together) and then cook for the calculated time. Never shorten the cooking time because although the meat may appear cooked, extra time must be allowed for cooking the stuffing thoroughly.
If you choose not to stuff your turkey then place aromatics in the body cavity of the bird. Cut a large onion in half and stud each half with 4 to 6 cloves. Place this in the body cavity of the bird. Cut an orange and a lemon into quarters and add these, together with 3 or 4 bay leaves, 4 to 6 fresh sage sprigs, and 2 to 3 fresh thyme sprigs. Add 1 cinnamon stick or 1 blade of mace for a festive hint of warm spice.
Turkeys are super easy to roast, but require a little more attention than smaller birds. Check to make sure the oven shelves are in the correct position before heating the oven. Preheat the oven to 350 degrees. Place the prepared bird on a rack in a large-size roasting pan. Smear the turkey breast generously with butter, season with salt & pepper and place in the oven. Baste the turkey from time to time during cooking. When the breast has browned, cover with foil to protect it and continue cooking. Remove the covering foil for the final 20 minutes of cooking. To check if the meat is cooked, insert a skewer into the thickest part of the thigh. If the juices run clear and the meat is white, it is cooked. If the juices are pink and the meat is soft and pink, the turkey is not ready. Return it to the oven and check again after 20 minutes. Cooking times will differ depending on whether your bird was purchased fresh or frozen. Plan on 20 minutes per pound in a 350 degree oven for a defrosted turkey and 10 to 15 minutes per pound for fresh. Remember to add more time if you’re turkey is stuffed. You should have an instant-read thermometer in your kitchen drawer. Insert the thermometer into the breast (all the way to the bone) and if it reads 160 degrees you’re good to go. You may also measure the thigh by inserting the thermometer into the thickest part, but not touching the bone, and it should read 165 degrees.
Remove the turkey from the oven and cover it closely with foil. Leave it to rest for at least 30 minutes. This will even out the temperature and make it easier to carve. I know some chefs who let it rest for 2 hours, but I don’t think that one needs to wait that long. If you wish to make gravy in the roasting pan, transfer the bird to a carving plate.
When you’ve let your bird rest awhile remove the trussing string. Hold the bird steady in position with a carving fork. Cut off the legs, then cut these in half or carve the meat from the bones. Make a horizontal cut across the breast above the wing. Carve neat and even vertical slices off the breast. Repeat on the other side of the bird. Arrange slices on a warmed platter. Add the turkey legs or sliced meat to the platter or set them aside for serving separately. Scoop out the stuffing and serve with the meat.
“Work With What You Got!”
© Victoria Hart Glavin Tiny New York Kitchen © 2016 All Rights Reserved
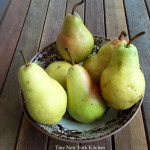
Pears
Season: June to October, but can be cold-stored until spring.
Pears are one of the few fruits that should be picked when under ripe. Buy hard pears a few days before you need them, and let them ripen at room temperature until they have a slight yield when given a gentle squeeze.
To core a pear, cut the pear in half lengthwise, and then scoop out the hard portions with a melon baller. Pear flesh (like apple) oxidizes when exposed to air, so rub the cut areas with lemon juice or white wine to keep them from turning brown.
“Work With What You Got!”
© Victoria Hart Glavin Tiny New York Kitchen © 2016 All Rights Reserved


