Roasting refers to proteins and vegetables cooked mostly at high temperatures in the oven. Baking uses a lower temperature to cook breads, baked goods, and casseroles.
Roasting makes any vegetable taste better. It brings out their flavor, caramelizes their natural sugars, and adds crunch. If your family doesn’t love certain vegetables like broccoli or Brussels sprouts, roasting is a great way to change their mind. Double what you’re roasting and then turn extra servings into quick meals later in the week. Cooking a little extra with one meal lets you make the most of value-sized packages of proteins and other store sales. With leftover already planned, you won’t need to lean on takeout.
Why we love to roast:
It’s Affordable! Inexpensive ingredients are tastiest when roasted. Root vegetables are browned and crisp, tomatoes and grapes are extra juicy and sweet, and tough cuts of beef are fall-apart tender. You also don’t need any special equipment to roast.
Roasting Is Healthful! Roasted foods need very little fat to cook compared to frying or sautéing. Roasting also intensifies flavors without added salt, sugar, or other ingredients.
It’s Easy! Roasted foods need little prep before they cook. And once the oven door closes, you can walk away. Fewer pans and utensils are needed, making cleanup easier too.
Essential Tools For Roasting:
Rimmed Sheet Pan: The rim keeps vegetables from falling off the sides and catches any juices from meats and fish.
Oven-Save Skillet: Go from stovetop to oven and back. Sear meats before roasting or make a pan sauce with the meat drippings after roasting.
Roasting Pan: Best for large roasts, hams, and turkeys. An inner rack lifts the meat so it can brown and crisp underneath.
Parchment Paper: Line pans to keep foods from burning and sticking, then toss for easy cleanup. If roasting at a higher temp or broiling use foil.
Metal Tongs: Flip and stir foods on a hot pan with ease. Look for tongs with a heat resistant grip.
Silicone Brush: Brush on a sticky glaze or baste foods with sauce. The silicone bristles are easy to clean.
Tips For Sheet Pan Roasting:
Jump Start Browning by preheating your sheet pan before adding vegetables.
Pat foods very dry with paper towels so the outside browns while the inside cooks through.
Cut foods to the same size and thickness so smaller pieces don’t burn.
Space out foods on the sheet pan so they have room to crisp and brown.
Let sheet pans cool before rinsing to keep the metal from warping.
©Tiny New York Kitchen © 2021 All Rights Reserved

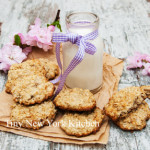
Holiday baking time is a fun time of the year with the kitchen filled with delicious aromas and an array of treats to share with friends and family. No matter what style or flavor is your favorite, follow these steps for the best cookies you’ve ever baked, every time.
Use Room Temperature Ingredients
Get eggs and butter out of the refrigerator early, so they blend better in your cookie dough. Your cookies will have better texture and volume when all the ingredients are evenly incorporated.
Measure With The Spoon & Sweep Method
Use a spoon to add dry ingredients like flour to a dry (flat edged) measuring cup, then level off with the back of a knife. This method gives you the right amount of flour for the recipe, so your cookies aren’t too dry or dense.
Chill Dough Before Shaping Or Slicing
Refrigerate at least 1 hour or even overnight, so the dough is easier to work with and cookies hold their shape. Giving the ingredients time to meld makes your cookies taste better too.
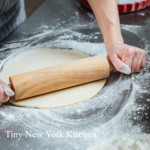
Flour Your Cookie Cutters As You Go
Keep a small bowl of flour next to your work surface when rolling and shaping cutouts. Dip cookie cutters in flour in between stamping so they release easily and don’t stick to the dough.
Use Parchment Paper To Line Baking Sheets
Ensure that your cookies won’t stick to the baking sheet by using parchment paper liners. Parchment can be used more than once depending on the style of cookie, then can be replaced for more baking and easier cleanup.
Rotate Sheets Halfway Through Baking
All ovens have hot and cold spots. Help cookies bake evenly by switching the sheets between the top and bottom oven racks or rotating the sheets 180 degrees on the rack halfway through the baking time.
Rest On Baking Sheets For 1 To 2 Minutes Before Moving To Cooling Rack
When cookies are removed from the oven, they can still be soft and molten on the inside. Let the cookies settle and cool for a minute or two before transferring to a wire cooling rack with a thin spatula.
Cool Baking Sheets To Room Temperature Between Batches
Unbaked dough can start to melt immediately on a hot baking sheet, causing cookies to spread and overcook in the oven. Let sheets cool to the touch before using again.
Cool Cookies Completely Before Frosting Or Storing
Frosting can soften and melt on warm cookies, while sealing cookies in a container before they are cooled can cause sogginess. Let cookies rest on a rack for at least 1 hour before decorating or packaging.
Add A Small Piece Of Bread Or Orange Peel To the Cookie Tin
The cookies will slowly absorb the moisture from the bread or peel, so they won’t go stale as quickly. Replace the bread or peel every few days as it dries out.
©Tiny New York Kitchen © 2020 All Rights Reserved
Whether you’re baking summer pies or getting ready for holiday baking it’s important to have some key information about pie dough.
Blind Baking
Blind baking is prebaking a crust before you add an unbaked or especially wet filling. To ensure that your crust turns out crisp while blind baking, you can either dock it or use pie weights.
Docking
Docking is pricking the dough all over with the tines of a fork. The tiny holes allow steam to escape, so that the crust doesn’t puff up. After rolling out your dough and pressing it into the pan, gently prick it, leaving an inch or two between each mark. Be sure to check your crust several times throughout its bake time. If you notice it puffing up in any way, simply prick the puffy spots a few times and keep baking.
Pie Weights
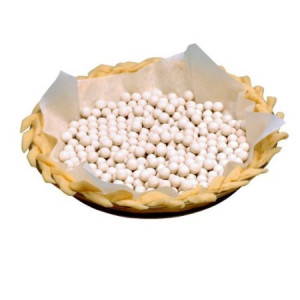
Pie weights are tiny ceramic or metal balls or a thin metal chain that prevent the bottom of your crust from forming air pockets and bubbling up while baking. While docking is less fussy than using pie weights, I prefer pie weights because of the additional support they give the crust. Line your unbaked crust with parchment paper or aluminum foil before adding the weights to keep them from baking into the dough. I prefer parchment paper because its permeable structure allows the crust to breathe and brown more evenly. If you don’t own pie weights, dried beans work just as well.
Blind Bake Ahead
You can blind bake a crust up to three days ahead of time. Allow the crust to cool completely in the pan, wrap with plastic wrap, and store at room temperature until you are ready to fill and serve.
Happy Pie Baking!
“Work With What You Got!”
© Victoria Hart Glavin Tiny New York Kitchen © 2017 All Rights Reserved
When making cookies make sure not to overcream the butter and sugar. Unlike cake batter baked in a pan, cookie dough is baked free-form. When the dough is heated and the chemical leaveners expand the air bubbles, the bubbles burst without a pan to force the dough upward, producing flat cookies. For cookies, cream the butter and sugar for only 1 to 2 minutes, just until the mixture is smooth but has not lightened in color.
Another insurance policy against flat cookies, chill butter-based cookie dough before baking. Butter has a low melting point, and starts to soften as soon as it is exposed to oven heat. Refrigerate the chilled dough for at least 30 minutes and up to 2 days before shaping and baking. This only works with dough that uses baking powder for leavening. Don’t do this with dough that includes baking soda as the leavener, which loses its rising power soon after it is mixed with wet ingredients.
Professionals use spring-loaded ice cream scoops to portion cookie dough, making cookies the same size that will bake at the same rate. A tablespoon-size scoop is the right capacity for most recipes.
For even baking and easy cleanup, bake your cookies on heavy-duty, rimmed aluminum baking sheets (half sheet pans) lined with parchment paper. To help the paper adhere, butter the baking sheet first. You can also line baking sheets with silicone baking mats instead of parchment paper.
If you’re using silicone mats, you may want to do a test run. Some cookie bottoms won’t crisp as well on the mat as they do on parchment lined baking sheets. Of course, this can be an advantage if you prefer soft, cakelike cookies.
There is no need to transfer cookies to a wire rack to cool. In fact, more harm can be done by transferring warm, delicate, pliable cookies to a rack than by letting them stand on the baking sheet. If you need to remove the cookies to use the baking sheet again, just let them cool on the sheet until they are firm enough to move.
To discourage overbrowned cookie bottoms (which can happen when an oven heats unevenly), insulate the baking sheet by placing it inside a second baking sheet of the same size. The think layer of air between the baking sheets will protect the top sheet from getting too hot.
Don’t store different types of cookies together or they will exchange flavors and textures. Tin or stainless steel covered containers work best for storage, but plastic containers can also be used as long as they are airtight and fragrance free.
To revive crisp cookies that have softened, bake them for 5 to 10 minutes in a 300 degree oven. Let them cool completely before storing.
To help soft cookies keep their texture, store them in an airtight container with a ceramic brown sugar softener, or with a piece of apple on a piece of aluminum foil, or soft bread. Make sure to remove the apple after 24 hours.
“Work With What You Got!”
© Victoria Hart Glavin Tiny New York Kitchen © 2017 All Rights Reserved

I love to bake all year long, but during the holidays I’m on “baking overdrive.” To make better cakes here are some simple tips to help you with the best outcome possible.
Don’t use cold eggs. The eggs really should be at room temperature, otherwise the mixture won’t emulsify properly. If you’re short on time place eggs in a bowl of warm water for 15 minutes.
Make sure to measure all ingredients precisely. Baking is an art form, but also a science.
Position pans as close to the center of the oven as possible. If you’re placing more than one pan in the oven, they should not touch each other or the oven walls. If your oven isn’t wide enough to put pans side by side, place them on different racks.
If a recipe calls for 1 cup of sifted flour, then first sift the flour and then measure it. If it calls for 1 cup flour sifted, measure the flour, then sift it. It may seem subtle, but it can make the difference between a light, fluffy cake and a heavy one.
Allow at least 20 minutes for your oven to preheat. It’s best to turn the oven on before you start working on your recipe.
Avoid opening the oven door. Opening the oven door too often can make a cake fall, so use the window in your oven door to check the cake’s process when possible.
Remember that each oven heats differently. Check for doneness 10 minutes before the recipe suggests. For most recipes, a cake is ready when it starts pulling away from the sides of the pan and a toothpick inserted in the center comes out clean.
Invest in wire cooling racks. Cakes cool faster and don’t get soggy when set out on a rack. Leave them in the pans for 10 to 15 minutes before unmolding, and then place on a rack to cool completely before frosting. Angel, chiffon and sponge cakes should be left in the pan to cool to prevent collapsing.
Unfrosted cakes can be stored, well wrapped in plastic, at room temperature for 24 hours. If storing unfrosted cakes for more than 24 hours, it is best to freeze them rather than refrigerate them. Wrap the layers in plastic wrap and then heavy-duty foil to freeze, let cake thaw in the refrigerator before frosting.
To store frosted cakes, keep at room temperature under a cake dome or large bowl unless the recipe specifies refrigeration.
For smooth and easy cake removal, prep your pans properly. When a recipe calls for greasing and flouring, place a piece of parchment or waxed paper on the bottom of a pan (trace and cut it to fit). Coat the sides and bottom with softened butter, and then dust with flour, turning the pan on its side to get full coverage and tapping out the excess. For chocolate cakes, swap in cocoa powder for flour.
Angel, chiffon, and sponge cakes should go into clean, untreated pans since they need to adhere to the sides in order to rise properly.
Happy Baking!
“Work With What You Got!”
© Victoria Hart Glavin Tiny New York Kitchen © 2016 All Rights Reserve

 A Few Words About Bacon
Bacon is salted, dried, cured or smoked meat from the back or sides of a pig. The term is derived from the Germanic bache/backe “back meat,” though at first the word referred to any part of a pig. Flitch (or slab bacon) designates a whole chunk of bacon before it is cut into slices. Burned bacon can be dangerous because burning it will produce carcinogens.
If you’re not doing it already then I have 3 words for you…BAKE YOUR BACON! Frying is the traditional way to cook bacon, but as we all know the high heat can make the bacon fat splatter all over the place. Baking applies lower heat, reducing splattering and shrinkage. It is also the best way to cook large amounts of bacon. Arrange the bacon slices side by side on a large, parchment paper lined, baking sheet. It’s a good idea if the baking sheet has a large rim on it. Bake in a preheated oven at 400º F for about 20 minutes or until the bacon is crisp and browned. Cooking food in the oven at this temperature is actually roasting, but there are times when the terms roasting and baking can be used interchangeably. Remove the rendered fat as it accumulates with a bulb baster, if necessary. When done it’s a good idea to transfer the bacon to paper towels to drain.
Generally bacon is about 50% fat. As it cooks, the fat becomes liquid and separates from the meat. This process is called rendering. The rendered fat can be put in a tightly covered container and stored in the fridge or freezer for sautéing or frying other foods.
Purchasing the leanest bacon can be counterproductive, as the fat gives the bacon most of its desirable flavor and crispness. Most of the extra fat melts off during cooking. The fat on bacon should be about 1/2 to 1/3 of the total weight. If you buy bacon from a butcher, you can ask for the rind to be removed and for the bacon to be sliced. A whole slab stays fresher longer. A butcher-cut slab can be stored for two weeks in the fridge or two months in the freezer. The freezing does create ice crystals which causes the bacon to splatter when fried stovetop.
Did you know that bacon can be frozen for up to 4 weeks? The curing process affects the stability of the fat, which means that bacon can turn rancid even when frozen. Although you can freeze the unopened package, it is usually better to separate the slices into conveniently sized amounts (about 4 ounces or so for breakfast). Wrap the bacon tightly in plastic wrap, then overwrap with aluminum foil. For added protection place in a ziplock bag. Long-term freezing is not recommended. Thaw thoroughly in the fridge before cooking.
Once the vacuum pack is opened, bacon will usually keep for only about a week in the fridge, although sometimes it will keep for a couple of weeks. The ends may darken and dry out and they should be sliced off and thrown away before using. To make bacon crumbles, chop the bacon first and then cook it.
Keep Calm and Eat Bacon!


 Pre-Baked Pie Crust: Five Steps For A Perfect Pie Crust
A pre-baked pie crust (sometimes called a blind baked pastry case) is one that has been partially baked without a filling so it can still cook and crisp thoroughly if the filling needs a shorter time to bake than the pastry. Pre-baking a pie crust also stops the pastry from getting soggy by a moist filling.
- Prick the base of the pie crust all over with a fork to stop the pastry from bubbling up and getting out of shape.
- Chill the pie crust in the refrigerator for at least 15 minutes before baking. This will stop it from shrinking during baking. Preheat your oven to 350º F.
- Place a large piece of parchment paper inside the pie crust, then fill with baking beans or uncooked rice. Ceramic beans or pie weights are available from most cooking stores or Amazon. Make sure that the paper is touching the pastry, eve at the edges.
- Bake for 10 to 15 minutes for a large pie crust or 8 to 10 minutes for a small one until the pastry is cooked and opaque.
- Carefully remove the parchment paper and the beans/rice/weights and then return the empty pie crust back in the oven for 10 minutes for a large pie crust or 4 to 5 minutes for a small one. When it is ready the base will be a sandy color, dry and crisp. The top edges of the pie crust should be golden. Leave in the pie tin or pie plate and continue with your chosen recipe.