
Here is another use for the whole grains and seeds that you’re seeing at the store. Top off with delicious flavoring, which are also tasty on oatmeal.
Amaranth (3/4 Cup)
Bring 2 1/4 cups water or milk to boil in saucepan. Stir in amaranth. Reduce heat to low, cover and simmer until tender. Cooking time is 25 to 30 minutes. Stir occasionally. Remove from heat and mix in or top with dried cherries, coconut sugar, macadamia nuts, vanilla, banana, or cacao nibs. Serves 2
Millet (3/4 Cup)
Bring 1 1/2 cups water or milk to boil in saucepan. Stir in millet. Reduce heat to low, cover and simmer until tender. Cooking time is 15 to 20 minutes. Stir occasionally. Remove from heat and mix in or top with chopped dates, demerara sugar, hazelnuts, cloves, clementine, or granola. Serves 2
Quinoa (3/4 Cup)
Bring 1 1/2 cups water or milk to boil in saucepan. Stir in quinoa. Reduce heat to low, cover and simmer until tender. Cooking time is 15 to 20 minutes. Stir occasionally. Remove from heat and mix in or top with dried apricots, agave syrup, pine nuts, cardamom, blueberries, or toasted coconut.
Serves 2
“Work With What You Got!”
©Tiny New York Kitchen © 2018 All Rights Reserved

The labels of many chocolate brands now state the amount of cacao (which means cocoa beans or any part of the beans, including cocoa butter) in their chocolate. The higher the cacao content, the less sugar the chocolate contains. You will also see chocolate described as bittersweet or semisweet. The USDA puts all sweetened dark chocolate, with cacao with a minimum of 35 percent chocolate liquor (ground cocoa beans without any additives), in the same category. These designations vary from brand to brand: one manufacturer’s bittersweet chocolate can be another manufacturer’s semisweet.
The average supermarket chocolate has 55 to 60 percent cacao. Chocolate with more than 60 percent cacao has what is considered a high cacao percentage. You may appreciate its bracing bitterness for eating, but because it contains so much more cacao than traditional chocolate, it can cause problems in cooking. Some contemporary cookbooks include the desired cacao percentage for the chocolate called for in their recipes, a plus for users. Unless a recipe specifically calls for a high-percentage chocolate, you are safest with a chocolate labeled 55 to 60 percent cacao.
Unsweetened chocolate is 99 to 100 percent cacao with no added sugar (some brands add a miniscule amount of vanilla and the emulsifier lecithin).
Milk chocolate has a minimum 10 percent chocolate liquor and includes dry milk solids and additional sugar to make it extra creamy and sweet. The latest trend is toward a higher percentage of chocolate liquor than in the past.
The best white chocolate has a base of cocoa butter, with sugar and milk solids added. Inferior brands substitute other plant fats, such as hydrogenated palm oil, for the cocoa butter, and are labeled white confectionary coating.
Traditionally, chocolatiers wanting a tiny, delicate chocolate coating for their creations would use couverture chocolate, which has a minimum of 32 percent cocoa butter to help it melt more smoothly and increase its fluidity. This extra measure of cocoa butter separated it from regular eating chocolate. However, the standard of today’s chocolate has improved to the point where virtually all chocolate has enough cocoa butter to be considered couverture, so the term is falling out of use.
Use a serrated knife to chop chocolate. Actually, think of shaving the chocolate from the block rather than hacking at it. Start at the corner of the bar and work backward, moving the knife about 1/4 inch after each cut. When you’ve lost the point of the corner, turn the bar around and start at another corner.
It may sound like a time-saver, but don’t use a food processor to chop chocolate. The chocolate can melt from the heat generated by the friction.
Small chunks of high-quality chocolate (pistoles) are a great time-saver if you need to melt chocolate and want to skip the chopping step. Semisweet chocolate chips may look similar, but they aren’t a good substitute. They contain a high percentage of lecithin, which helps them keep their shape during baking, so they don’t melt.
Chocolate has two enemies, heat and water. Use gentle heat when melting dark chocolate, as it scorches above 120 degrees F (milk and white chocolates scorch at 110 degrees F and need extra attention). Keep all surfaces and utensils dry. If you use a double boiler to melt chocolate, never allow the water to boil. The resulting steam can get into the chocolate and thicken it irretrievably, which is known as seizing.
The traditional method for melting chocolate is in a double boiler. It melts at below body temperature, so very hot water works fine. Just bring about 2 inches of water to a boil in the lower pan of the double boiler, then remove it from the heat. Place the top pan with the chopped chocolate over the low pan, making sure the top pan doesn’t touch the water. Chocolate holds its shape even when warm, so stir the chocolate frequently with a rubber or silicone spatula while it melts to check its progress. Be careful not to overheat chocolate, as it can scorch easily.
A variation on the double boiler method is good for large amounts of chocolate. Put the chopped chocolate in a wide stainless-steel bowl. Now place the bowl in a large skillet of very hot water, taking care not to splash any water in the chocolate. With a larger surface area of the chocolate exposed to heat, the chocolate will melt more quickly than in a double boiler.
You can melt chocolate in a microwave oven, but you must be careful not to overheat it. Use medium (50 percent) power for 40 seconds, and then check the chocolate. If it has not melted, continue to melt it, checking it at 20-second intervals. When you take it out of the microwave, the chocolate may not look melted, but sometimes brief stirring will push all or most of it to the melted stage. If all the chocolate has not melted, return it to the microwave for about 15 seconds at medium power. Because of the wide variability in the power put off by microwave ovens, you will have to learn to judge how quickly your microwave melts chocolate.
“Work With What You Got!”
© Victoria Hart Glavin Tiny New York Kitchen © 2017 All Rights Reserved

When making cookies make sure not to overcream the butter and sugar. Unlike cake batter baked in a pan, cookie dough is baked free-form. When the dough is heated and the chemical leaveners expand the air bubbles, the bubbles burst without a pan to force the dough upward, producing flat cookies. For cookies, cream the butter and sugar for only 1 to 2 minutes, just until the mixture is smooth but has not lightened in color.
Another insurance policy against flat cookies, chill butter-based cookie dough before baking. Butter has a low melting point, and starts to soften as soon as it is exposed to oven heat. Refrigerate the chilled dough for at least 30 minutes and up to 2 days before shaping and baking. This only works with dough that uses baking powder for leavening. Don’t do this with dough that includes baking soda as the leavener, which loses its rising power soon after it is mixed with wet ingredients.
Professionals use spring-loaded ice cream scoops to portion cookie dough, making cookies the same size that will bake at the same rate. A tablespoon-size scoop is the right capacity for most recipes.
For even baking and easy cleanup, bake your cookies on heavy-duty, rimmed aluminum baking sheets (half sheet pans) lined with parchment paper. To help the paper adhere, butter the baking sheet first. You can also line baking sheets with silicone baking mats instead of parchment paper.
If you’re using silicone mats, you may want to do a test run. Some cookie bottoms won’t crisp as well on the mat as they do on parchment lined baking sheets. Of course, this can be an advantage if you prefer soft, cakelike cookies.
There is no need to transfer cookies to a wire rack to cool. In fact, more harm can be done by transferring warm, delicate, pliable cookies to a rack than by letting them stand on the baking sheet. If you need to remove the cookies to use the baking sheet again, just let them cool on the sheet until they are firm enough to move.
To discourage overbrowned cookie bottoms (which can happen when an oven heats unevenly), insulate the baking sheet by placing it inside a second baking sheet of the same size. The think layer of air between the baking sheets will protect the top sheet from getting too hot.
Don’t store different types of cookies together or they will exchange flavors and textures. Tin or stainless steel covered containers work best for storage, but plastic containers can also be used as long as they are airtight and fragrance free.
To revive crisp cookies that have softened, bake them for 5 to 10 minutes in a 300 degree oven. Let them cool completely before storing.
To help soft cookies keep their texture, store them in an airtight container with a ceramic brown sugar softener, or with a piece of apple on a piece of aluminum foil, or soft bread. Make sure to remove the apple after 24 hours.
“Work With What You Got!”
© Victoria Hart Glavin Tiny New York Kitchen © 2017 All Rights Reserved
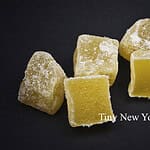
Crystallized ginger is fresh ginger that has been slowly cooked in sugar water and rolled in coarse sugar for preservation. It has a sweet, spicy taste and can easily be made at home.
“Work With What You Got!”
© Victoria Hart Glavin Tiny New York Kitchen © 2017 All Rights Reserved

There’s nothing like the smell of freshly brewed morning coffee whether it’s perked, dripped or pressed, it’s the most favorite part of my day. Coffee is my morning ritual, but coffee is not just for mornings. If you have a bit of extra brewed coffee or grounds lying around then you can “perk” up the flavor of pretty much anything. The earthy flavor works in everything from meat marinades, sweet syrups, and many savory and sweet recipes using coffee as an ingredient, from tangy sauces for a tender filet mignon to a few teaspoons flavoring your favorite cakes or cookies. When added to a chocolate cake or a cookie, coffee brings out the flavor especially in chocolate. When the recipe calls for water just use what’s leftover in the pot. In many recipes you can just add a teaspoon of instant coffee or even espresso powder.
Add flavor fast to a roast by using that leftover coffee in your marinade, which also helps tenderize the meat. You can also use it to the braising liquid for beef short ribs. As the liquid cooks down, the coffee caramelized adds a delicious bittersweet dimension to the dish. I also like to stir a bit of coffee into barbecue sauce for grilled chicken or add some to homemade chili to round out the flavor.
Add coffee grounds to your spice shelf! The combination of ground coffee, kosher salt, and paprika will add flavor to your dishes. Use it to make a crusted pork or brisket dish. Rub the coffee ground spice combination to burgers before grilling them.
I like using instant espresso powder in my desserts. Unlike coffee grounds, espresso powder dissolves completely in hot water, eliminating grittiness that you may not want in most baked goods. Keep in mind that it packs a powerful punch, so a little goes a long way. Add a small amount to brownies or cakes. Freeze it with sugar for an easy granita or reduce it with sugar and cream to create a rich glaze.
“Work With What You Got!”
© Victoria Hart Glavin Tiny New York Kitchen © 2017 All Rights Reserved

The average life expectancy for men was 47 years old.
Americans spent 1/3 of their income on food.
Children remained under their parents’ roofs until they were married.
Fuel for cars was only sold in drug stores.
Only 14 percent of the homes had a bathtub.
Only 8 percent of the homes had a telephone.
Ten percent of infants died in their first year.
The maximum speed limit in most cities was 10 mph.
Men wore blue serge suits at work.
The tallest structure in the world was not in the U.S., but was France’s Eiffel Tower.
The average U.S. wage in 1910 was 22 cents per hour.
The average U.S. worker made between $200 and $400 per year.
A competent accountant could expect to earn $2,000 per year.
A dentist could make $2,500 per year.
A veterinarian could make between $1,500 and $4,000 per year.
A mechanical engineer could make about $5,000 per year.
More than 95 percent of all doctors had no college education. Instead, they attended so-called medical schools, many of which were condemned in the press and the government as “substandard.”
Sugar cost 4 cents per pound.
Eggs were 14 cents per dozen.
Coffee was 15 cents per pound.
Most women only washed their hair once a month. They used Borax or egg yolks for shampoo.
Canada passed a law that prohibited poor people from entering into their country for any reason.
The five leading causes of death were: Pneumonia and Influenza, Tuberculosis, Diarrhea, Heart Disease, and Stroke.
The American flag had 45 stars.
The population in Law Vegas, Nevada was only 30.
Crossword puzzles, canned beer and iced tea hadn’t been invented yet.
There was neither a Mother’s Day nor a Father’s Day.
Two out of every 10 adults could not read or write.
Only 6 percent of all Americans had graduated from high school.
Marijuana, heroin and morphine were all available over the counter at local drug stores. Back then pharmacists said, “Heroin clears the complexion, gives buoyancy to the mind, regulates the stomach, bowels, and is, in fact, a guardian of health.”
18 percent of households had at least one full-time servant or domestic help.
There were about 230 reported murders in the ENTIRE United States.
It’s amazing how fast everything has changed and it’s impossible to imagine what it will be like in another 100 years!
“Work With What You Got!”
© Victoria Hart Glavin Tiny New York Kitchen © 2017 All Rights Reserved
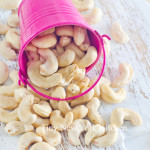
It’s January and many of us are working towards our health goals. Choosing foods that give us energy are important in keeping on track. Some foods that boost energy levels include cashews, chicken, salmon, and beans.
Cashews
Cashews are high in magnesium and help to convert sugar into energy. Magnesium deficiency can lead to low energy levels and nuts that are high in magnesium, including cashews; can provide that mid-afternoon jolt some people are seeking. Cashews are high in calories, so it’s best for those looking to shed pounds or maintain a healthy weight to adhere to serving suggestion guidelines.
Skinless Chicken
Alertness tends to increase when the brain produces the neurotransmitter dopamine and the hormone norepinephrine. Skinless chicken contains an amino acid known as tyrosine that helps in the production of both dopamine and norepinephrine. If skinless chicken is not available, other foods that may provide this same effect include fish, lean beef, and eggs. In addition, lean meats like skinless chicken contain enough vitamin B to help ease insomnia.
Salmon
Omega-3 fatty acids can help the body fight inflammation, which has been linked to a host of ailments, including chronic fatigue. Salmon is also high in protein, which can eliminate the mid-to-late afternoon hunger pangs that can derail healthy diets and contribute to weight gain.
Beans
Beans are loaded with fiber, and that’s a great thing for energy levels. Like magnesium, which can also be found in beans, fiber takes a while to digest, extending the energy-boosting properties of foods loaded with fiber. In spite of the growing movement to eat and live healthier, many still do not include enough fiber in their diets. Eating beans is a great place to start getting that much needed fiber.
“Work With What You Got!”
© Victoria Hart Glavin Tiny New York Kitchen © 2017 All Rights Reserved

While the Nutrition Fact label can tell you a lot about a food, you need to check the ingredients list to see what you’re really eating. Is your breakfast cereal made with whole grains or does your favorite salad dressing contain oil that is high in saturated fat, for example.
By law, ingredients lists must be ordered by weight. The heaviest ingredient goes first, followed by the next heaviest, and so on. It is not a good sign if sugar is the first ingredient in a cereal or when bad fats like partially hydrogenated soybean and cottonseed oils are the third ingredient listed on a can of biscuit dough.
Below is a list of common phrases found on many food packages:
Cholesterol Free or No Cholesterol: Don’t be fooled by the words No Cholesterol written across the label of a jar of peanut butter or bottle of canola oil. If you turn to the Nutrition Facts label, you’ll see that no brand of either food has cholesterol – and never did! Only foods of animal origin contain cholesterol. But manufacturers hope you don’t know that.
Light: This word is used to describe fat content, taste, or color. If the manufacturer is describing the fat content as “light,” the product has at least 50 percent less fat than the original. The label must also say “50% less fat than our regular product.” “Light” olive oil, on the other hand, describes the oil’s color. The oil is as caloric as regular olive oil, but has been processed to remove some of its flavor. A muffin mix can say “light and fluffy” as a way to describe its texture or consistency.
Low-Fat or Fat-Free: Low-fat products must contain 3 grams or less fat per serving and fat-free products must have less than 0.5 grams of fat per serving. But check the number of calories – that number could be very high. It is easy to gain lots of weight eating fat-free cookies because they are loaded with sugar.
Low Sodium or Light In Sodium: This means that the sodium was cut by at least 50 percent over the original product. Be careful when using a “low” version of a super-high-sodium food such as soy sauce or soup. You can still end up consuming a lot of sodium. Check the numbers on the Nutrition Fact Label.
Sugar-Free, No Added Sugars, Without Added Sugars: A sugar-free chocolate candy may not contain a speck of sugar, but it’s still got plenty of fat and calories. Be sure to check out the Nutrition Facts label to know how many calories and grams of saturated fat you’re consuming.
Sweetened With Fruit Juice, Fruit Juice Sweetener, or Fruit Juice Concentrate: These sweeteners are made by reducing fruit juice (usually grape juice) into a sticky sweetener. These sweeteners are not nutritious. They are just like sugar.
“Work With What You Got!”
© Victoria Hart Glavin Tiny New York Kitchen © 2017 All Rights Reserved
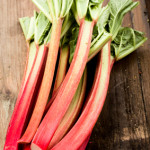
Rhubarb
Rhubarb is one of the first delights of spring, and there are many ways to use it. If you have an abundance of rhubarb in your garden, it will freeze successfully. After you have cut rhubarb up and thrown away the leaves, steeping it overnight has several advantages. You don’t need to use as much sugar as the average recipe calls for, the rhubarb will then cook quickly, and you have the dividend of pure rhubarb juice (no water added) to use as a cooking drink.
To cook rhubarb: Use a proportion of 4 cups sliced rhubarb cut in 1/2 inch pieces to 1 cup sugar. Toss the rhubarb and sugar together and let steep overnight (you will be amazed at how much juice the rhubarb gives off). Pour off 1/4 cup of the liquid and use for a drink. Cook the rhubarb slices in the remaining liquid until just tender, but still holding their shape (less than 5 minutes). The rhubarb is ready to eat as is, to freeze in containers, or to use in recipes.
“Work With What You Got!”
© Victoria Hart Glavin Tiny New York Kitchen © 2016 All Rights Reserved

In the old days, buttermilk was what was left in the butter churn. Nowadays, it’s manufactured with healthy bacteria much like yogurt. Buttermilk is made with very little fat or none at all. Either way, it adds a nice fresh tang and texture to baked goods. In the summer it’s nice to purée peaches with a little sugar, add buttermilk, and freeze in an ice cream maker to create a healthy low-fat homemade version of frozen yogurt. Buttermilk will keep for several weeks in the coldest part of your refrigerator.
“Work With What You Got!”
© Victoria Hart Glavin Tiny New York Kitchen © 2016 All Rights Reserved


