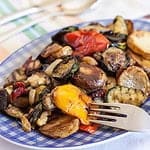
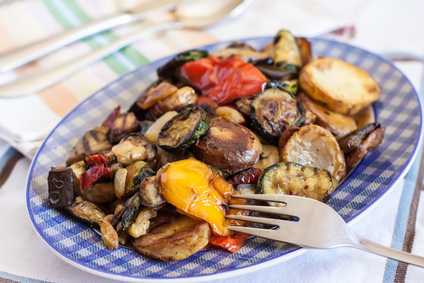
Grilled Vegetable Platter
Grilled vegetables are so good. Feel free to exchange vegetables if you want. To roast peppers place them on a baking sheet and broil them 3 to 4 inches from the heat. Use tongs to turn them often until they are blistered on all sides, about 20 minutes. Don’t worry if parts of the skin blacken. Place peppers in a paper bag for 10 minutes to steam. Then peel and cut them as desired.
INGREDIENTS
Kosher Salt
1 Medium Eggplant (Sliced Lengthwise)
1 Medium Zucchini (Sliced Lengthwise)
1 Belgian Endive (Quartered)
1 Small Head Radicchio
Olive Oil
1 Red Bell Pepper (Roasted, Peeled, Quartered Lengthwise & Seeded)
1 Yellow Bell Pepper (Roasted, Peeled, Quartered Lengthwise & Seeded)
1 Green Bell Pepper (Roasted, Peeled, Quartered Lengthwise & Seeded)
2 Tablespoons Gorgonzola
Preheat your oven to 450 degrees. Sprinkle a griddle with kosher salt and heat it. Brown eggplant and zucchini lightly on heated griddle, turning often. Remove and drain on paper towels. Brush endive and radicchio with olive oil. Grill until golden brown. Drain on paper towels. Arrange all vegetables on an ovenproof platter. Bake for 5 minutes. Sprinkle with Gorgonzola and bake 1 minute longer or until cheese melts. Remove from oven and use a paper towel to remove excess liquid from platter. Sprinkle vegetables with 1 tablespoon olive oil and serve hot. Serves 4
© Victoria Hart Glavin
![]()
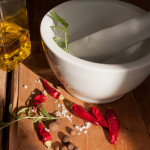
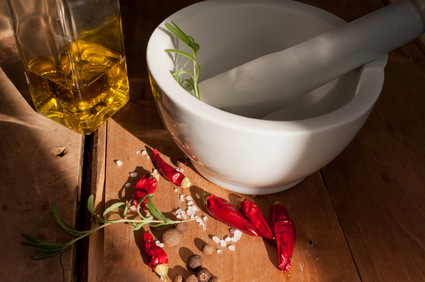
Marinade Medley
I never purchase store bought marinade. I always make my own. Here are three easy marinades that will improve any meat dish.
Jerk Marinade
INGREDIENTS
1/4 Cup Unsweetened Pineapple Juice
2 Tablespoons Olive Oil
1 Tablespoon Jamaican Jerk Seasoning
1 Tablespoon Minced Garlic
1/4 Teaspoon Kosher Salt
In a small-size bowl stir together pineapple juice, olive oil, jerk seasoning, garlic and kosher salt. Use for poultry, beef, pork or fish.
Sweet Chili Marinade
INGREDIENTS
1/2 Cup Asian Chili Sauce (Sriracha Sauce)
1/4 Cup Rice Vinegar
1 Tablespoon Chopped Green Onion
1 Teaspoon Ground Ginger
1 Teaspoon Crushed Red Pepper
1/4 Teaspoon Kosher Salt
In a small-size bowl stir together Asian chili sauce, rice vinegar, green onions, ginger, red pepper, and kosher salt. Use for poultry, beef, pork or fish.
Mexican Marinade
INGREDIENTS
1/4 Cup Red Wine Vinegar
2 Tablespoons Olive Oil
1 Tablespoon Minced Garlic
1 1/2 Teaspoons Crushed Dried Oregano
1 Teaspoon Chili Powder
1/2 Teaspoon Ground Cumin
1/4 Teaspoon Kosher Salt
In a small-size bowl stir together red wine vinegar, olive oil, garlic, oregano, chili powder, cumin, and kosher salt. Use for poultry, beef, pork or fish.
© Victoria Hart Glavin
![]()
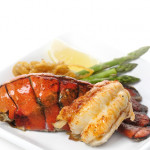

Grilled Lobster Tails
If you want to go all out this weekend then grill lobster tail. It’s easy and delicious. Always grill lobster in its shell to protect the delicate meat from overcooking. Plus, once grilled, the meat is easier to remove.
INGREDIENTS
4 Fresh Lobster Tails (American or Rock Lobster)
3 Tablespoons Olive Oil
1/2 Teaspoon Finely Shredded Lemon Peel (Set Aside)
4 Teaspoons Lemon Juice
3 Minced Garlic Cloves
1 Teaspoon Chili Powder
1/2 Cup Mayonnaise
1 Teaspoon Fresh Snipped Dill
Lemon Wedges
Using kitchen shears, cut lobster tails in half lengthwise through centers of hard top shells, meat, and bottoms of shells. Set aside. In a small-size bowl stir together olive oil, 2 teaspoons lemon juice, garlic, and chili powder. Brush onto exposed lobster meat, reserving extra juice mixture. For a charcoal grill, grill lobster tails, cut sides down, on a rack of an uncovered grill directly over medium coals for 10 to 12 minutes or until meat is opaque, turning once and brushing with remaining juice mixture halfway through grilling. Do NOT overcook. For a gas grill, preheat grill. Reduce heat to medium. Place lobster tails, cut sides down, on rack over heat. Cover and grill for 10 to 12 minutes or until meat is opaque. Meanwhile, for dipping sauce, stir together mayonnaise, dill, lemon peel, and remaining lemon juice. Serve lobster with dipping sauce and lemon wedges. Serves 4
© Victoria Hart Glavin
![]()

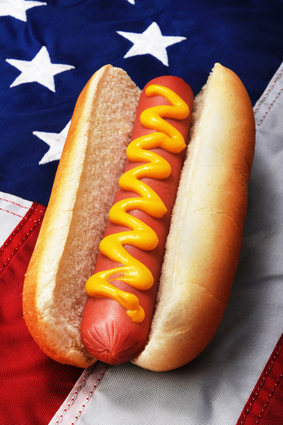
Hot Diggity Dog
Ok, I’ll admit it, I love hot dogs. The best hot dog that I’ve ever had, however, was the Sonoran Hot Dog in Tucson, Arizona. Sitting next to gang members and their families all enjoying hot dogs together (I used to be the New York Court's Gang Expert which is another story altogether). I typically like my dogs with basic yellow mustard, but you can top yours with just about anything you can think of. Did you know that hot dogs are one of the most popular grillables in the United States? In fact, the average person will eat about 60 hot dogs in a year. Live in an urban area? Don’t own a grill? No problem! Go out and get yourself a hefty grill pan. Remember, most anything you can cook on a grill you can cook in a grill pan on your stove or in the oven. Please don’t boil your dogs in water. That’s just not cool.
Let’s start with the basics. There are more hot dog choices today than ever before. Taste is key, but it’s also important to consider your options. Casing or skinless (I like dogs with casing for texture), type of filling (beef, pork, poultry, or a combination), kosher (no pork), stuffed (cheese, apple), healthy (lean, vegetarian, vegan), uncured (no nitrates).
Grilled Hot Dog Pointers
Give Them A Roll: Keep the dogs moving by rolling occasionally with a spatula. The idea is to create tasty texture by blistering and browning as much of the exterior as possible.
Toasty: Save a step by warming the buns right on the franks for 1 minute before they’re done. Once toasted, you can grab the bun and dog together and place on a waiting platter.
Trick Out Your Dogs
Try these fun ideas to spruce up your dogs.
Spiral Dog: Skewer the hot dog top to bottom, then use a paring knife to cut a diagonal spiral down the length of the hot dog. Remove the skewer and grill as directed.
BBQ Dogs: Brush hot dogs with barbecue sauce, then grill as directed.
Bacon Dog: Partially cook bacon in the microwave on a paper towel-lined plate until cooked through but still pliable (about 2 minutes on high). Wrap hot dog with bacon, securing with toothpicks at both ends, then grill as directed.
Grilled Hot Dogs
INGREDIENTS
8 Hot Dogs
For a charcoal or gas grill, place hot dogs on the grill rack directly over a medium heat. Cover and grill for 3 to 7 minutes or until heated through, turning occasionally. Remove from grill. During the last minute, place a hot dog bun, cut sides down, over each hot dog on grill rack. Cover and grill for 1 minute more or until buns are warmed and lightly toasted. Remove hot dogs and buns together. Serve and top as desired. Makes 8 hot dogs.
Chicago Dogs
INGREDIENTS
3/4 Cup Quartered Cherry Tomatoes
1/3 Cup Chopped Celery
1/3 Cup Chopped Seedless Cucumber
1/3 Cup Chopped Onion
1/4 Cup Sweet Pickle Relish
3 Teaspoons Cornichon Juice
1/2 Teaspoon Celery Seeds
1/2 Teaspoon Poppy Seeds
1 Recipe Grilled Hot Dogs (Above)
Yellow Mustard
12 Cornichons (Have Lengthwise)
Pepperoncini Peppers
In a small-size bowl, combine tomatoes, celery, cucumbers, onions, pickle relish, cornichon juice, celery seeds, and poppy seeds. Drizzle each of the Grilled Hot Dogs with mustard. Spoon tomato mixture onto hot dogs. Tope with cornichons and pepperoncini peppers. Serves 8
Summer Dogs
INGREDIENTS
1 Cup Grilled Corn Kernels
1/3Cup Finely Chopped Onion
1/3Cup Snipped Fresh Basil
1 Tablespoon Mayonnaise
1 Tablespoon Sour Cream
1 Tablespoon Red Wine Vinegar
1/4 Teaspoon Kosher Salt
1/4 Teaspoon Freshly Ground Pepper
1/8 Teaspoon Sugar
1 Recipe Grilled Hot Dogs (Above)
2 2/3 Cups Shredded Romaine Lettuce
2 Medium Roma Tomatoes (Thinly Sliced)
1 Medium Avocado (Seeded, Peeled, Thinly Sliced)
Sliced Fresh Jalapeno Chile Peppers (Optional)
In a small-size bowl, combine corn, onions, basil, mayonnaise, sour cream, vinegar, kosher salt, pepper, and sugar. Fill each of the Grilled Hot Dogs with 2/3 cup of shredded lettuce. Arrange tomato slices on one side of buns and avocado slices on the other side of buns. Top each hot dog with about 1 tablespoon corn mixture. If desired, sprinkle with jalapeno peppers. Pass around the remaining corn mixture. Serves 8
Chili-Mac Dogs
INGREDIENTS
1 Recipe Grilled Hot Dogs (Above)
8 Ounces Deli Macaroni Salad
1 1/3 Cups Warmed Prepared Chili
1/2 Cup Shredded Sharp Cheddar Cheese
1/2 Cup Crushed Corn Chips
1/2 Cup Chopped Red Onion
1/4 Cup Snipped Fresh Cilantro
8 Ounces Sour Cream (Optional)
For each of the Grilled Hot Dogs, spread about 2 tablespoons of the macaroni salad onto one side. Spoon a generous 2 tablespoons of the warm chili over each hot dog. Sprinkle with cheese, corn chips, onions, and cilantro. If desired, top with sour cream. Serves 8
Tip: If using, place sour cream in a 1-quart heavy resealable plastic bag. Seal bag, snip a small hole in one corner of the bag (this makes a piping bag). Squeeze to drizzle sour cream evenly onto hot dogs.
Russian Dogs
INGREDIENTS
1/4 Cup Mayonnaise
1/4 Cup Ketchup
2 Tablespoons Drained & Diced Pimiento
1 Tablespoon Prepared Horseradish
1 Tablespoon Sweet Pickle Relish
1/2 Tablespoon Coarse Ground Black Pepper
1 Recipe Grilled Hot Dogs (Above)
8 Thin Slices Swiss Cheese
1 Cup Rinsed & Drained Sauerkraut
Caraway Seeds
For sauce, in a small-size bowl, combine mayonnaise, ketchup, pimiento, horseradish, pickle relish, and pepper. For each of the Grilled Hot Dogs, line one side of buns with cheese slices. Top hot dogs with sauerkraut and sauce. Sprinkle with caraway seeds. Serves 8
Hawaiian Dogs
INGREDIENTS
1/4 Cup Balsamic Vinegar
2 Tablespoons Packed Brown Sugar
1 Tablespoon Vegetable Oil
1 Tablespoon Soy Sauce
2 Teaspoons Asian Chili Paste (Sambal)
1 Large Red Onion (Thinly Sliced & Separated Into Rings)
1/4 Of A Cored Fresh Pineapple
Cayenne Pepper (Optional)
1 Recipe Grilled Hot Dogs (Above)
Teriyaki Sauce
1/2 Cup Thinly Sliced Green Onions (Optional)
Sesame Seeds (Optional)
In a medium-size bowl, combine vinegar, brown sugar, oil, soy sauce, and chili paste. Add onion rings; stir to coat. Cover and marinate at room temperature for 30 minutes, stirring frequently. Drain onion rings. Throw away marinade. Meanwhile, cut pineapple lengthwise into four wedges. If desired, sprinkle with cayenne pepper. For a charcoal or gas grill, place pineapple wedges on grill rack directly over medium heat. Cover and grill for 3 to 4 minutes or until grill marks appear, turning occasionally. Remove from grill. Chop pineapple. Pat dry with paper towels. Place a grill basket on grill rack until basket is hot. Add onion rings to hot basket. Cover and grill for 6 to 8 minutes or until onion rings are tender and slightly charred, stirring frequently. Top each of the Grilled Hot Dogs with pineapple and grilled onion rings. Drizzle with teriyaki sauce. If desired, sprinkle with green onions and sesame seeds. Serves 8
© Victoria Hart Glavin
![]()
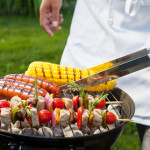
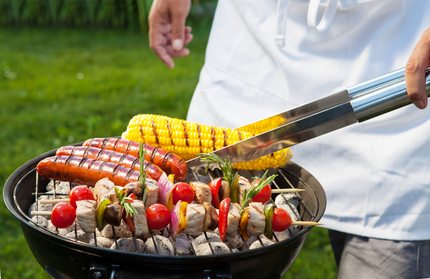
Grill Safety
It’s that time of year again when Memorial Day weekend seems to have become “opening weekend” for grilling. I personally grill all year long and have been known to grill in both heavy rainstorms and blizzards. I always use a charcoal grill, but if you use a gas grill you’re forgiven. Whatever type of grill you have it’s important be follow basic grilling safety rules. You don’t want a trip to the hospital or an emergency visit by your local fire department. You are cooking with fire after all!
1. Position your grill in a well-ventilated area at least 10 feet away from trees, the house, and ANY combustible materials.
2. NEVER set up a charcoal or gas grill inside a garage, porch, or enclosed area.
3. Keep children and pets a safe distance from the hot grill.
4. Use heat-resistant mitts and tools with long handles.
5. Keep a fire extinguisher handy in case of emergency. DO NOT pour water on a grease fire.
6. Never leave a grill unattended or try to move it while it is in use or still hot.
7. Limit your alcohol consumption while grilling. Once when I was a teenager I came home from the neighborhood pool (where I was a lifeguard) to find my stepfather “asleep” after a few too many beers and the grill was completely up in flames. Not a good thing!
8. Periodically test your gas grill for leaks and clean the venturi tubes regularly according to the manufacturer’s directions.
9. Allow coals to burn completely and ashes to cool for 24 hours before disposing of them.
10.Fat and meat juices that drip onto the heat source can cause flare-ups. If flare-ups occur, move food to another location and close the lid to kill the flames. As a last resort, remove the food and mist the fire with water from a spray bottle.
11.Let the grill cool completely before covering or storing it.
Have fun grilling, enjoy your friends and family this weekend, and by all means grill safely.
© Victoria Hart Glavin
![]()
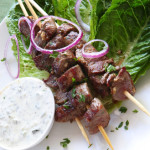
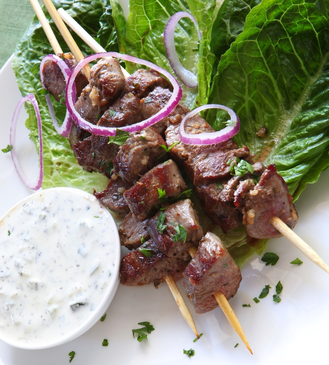
Grilled Lamb Kabobs
This has to be one of the easiest meals to make. If you don’t have a grill then by all means cook these kabobs under the broiler.
INGREDIENTS
4 Minced Garlic Cloves (Minced To A Fine Paste)
3 Tablespoons Olive Oil
1 1/2 Teaspoons Kosher Salt
1 1/2 Teaspoons Minced Rosemary
1 Teaspoon Red Pepper Flakes
1/4 Teaspoon Freshly Ground Pepper
2 Pounds Lamb Chops Cut Into 1/4 Inch Cubes
*You can also use lamb sirloin steaks or boneless leg or precut kabob meat
6 to 8 Wooden Skewers (Soaked In Water)
In a large-size bowl combine garlic, olive oil, kosher salt, rosemary, red pepper flakes, and pepper. Add lamb cubes and marinate for 30 minutes. Preheat grill (or oven broiler) to medium-high. Thread lamb onto skewers. Grill for 2 to 4 minutes on each side for medium-rare. Remove from grill and serve warm. Serve with Greek salad and a side of tzatziki sauce. Serves 4
© Victoria Hart Glavin
![]()
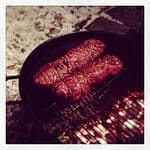
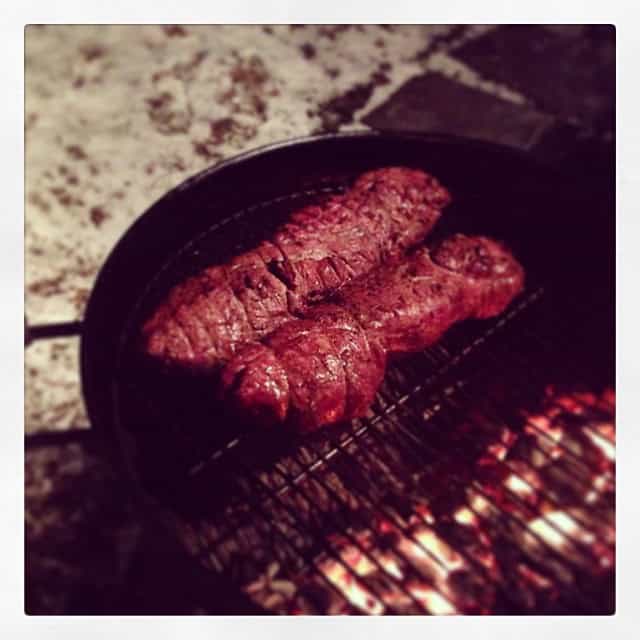
Grilling Beef Tenderloin
Beef Tenderloin (the long muscle that runs from the rib cage to the pelvis) is the most tender and most expensive cut of beef. Tenderloin tends to lack that beefy flavor that most people crave. I think that grilling it provides that extra flavor kick that makes the whole adventure worthwhile.
Purchase a completely trimmed tenderloin. You will pay big bucks for this beauty!
Remove the tenderloin from the fridge about 45 minutes prior to grilling. You will want it to come to room temperature. Rub with olive oil, pepper and salt liberally with kosher salt. You will notice that one end is thicker than the other. You will need to tie the tenderloin for even cooking. Take the smaller end of the tenderloin and fold it under by 2 inches. Tie in place with a couple of pieces of butcher twine. Tie any other loose pieces with butcher twine as well.
Prepare your grill. You will to pile coals up on one side of the grill. This creates a hot zone, which also creates a cooler zone on the other side. This is what is known as Indirect Grilling.
After your grill is hot and ready to go you will need to sear each side of the tenderloin for 2 minutes on each of the four sides. This creates a nice crust. After searing all four sides, transfer to the cooler side of the grill. Cover the grill with the lid and allow tenderloin to cook over the indirect heat anywhere from 15 to 25 minutes. Turn only once during the cooking time. For rare the temperature should be 120 degrees, medium-rare 130 degrees, etc. It’s not a good idea to cook beyond medium as you risk having a dried out tenderloin. Tenderloin will also continue to cook a bit while resting so you should remove it just a bit earlier, from the grill, than you might think.
Remove from grill and transfer to cutting board. Rest for 15 minutes before carving. Letting it rest allows it to retain more juices during carving.
Carve and transfer to serving platter. Your guests will give you a standing ovation!

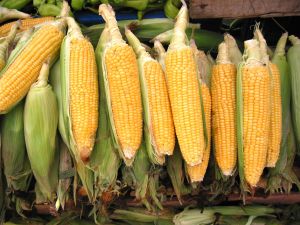 Barbecued Corn on the Cob
Two of summer’s most appealing joys are barbecuing and corn on the cob. This combination is an easy-to-prepare picnic vegetable. It’s a perfect accompaniment to barbecued meats or poultry, and it goes right on the grill with them.
INGREDIENTS
4 Unhusked Ears of Corn
Butter
Salt
Pepper
Pull the husks back from the ears of corn, leaving the husks attached at base, and remove the silk. Cut off 2 or 3 pieces of husk; cut lengthwise into 1/2 inch strips and set aside. Replace the husks and tie each ear closed with 1 or 2 of the reserved strips to seal completely. Soak in ice water for about 30 minutes. Darin well; seal in plastic bags and transport in a cooler (if you are going on a picnic). Place the corn on a grill 4 to 6 inches above a solid bed of glowing coals. Cook for 15 to 20 minutes, turning occasionally to cook evenly. To serve, discard the husks and season the corn with butter, salt, and pepper. Makes 4 servings.
 Grilled Duck Breasts
I don’t often eat duck because quite frankly I forget about it. While I was at the market last weekend I ran across duck breasts and decided to throw them in my cart not knowing what I was going to do with them of course. Here is what I came up with.
INGREDIENTS
8 Duck Breasts (2 per Person)
1 Bottle Beer
1/4 Cup Meat Rub
8 Tablespoons Olive Oil
Ziplock Bag
Most of you know that I’m really into marinating things in the ziplock bags. For these duck breasts you really need to marinate them overnight in the beer. Place the duck breasts into the ziplock bag and pour the beer in. Zip up the bag and give it a gentle shake to evenly distribute the beer. Place the filled bag onto a plate in case there is any drip and put into the fridge overnight. Remove from the fridge when you are getting ready to grill. Remove the duck from the beer and throw the beer away. Place the duck onto a large plate and drizzle both sides with the olive oil. Then rub your favorite meat rub onto both sides of the duck breasts. I used Victoria’s Dry Rub which was fabulous. After preparing the duck breasts let them rest on the counter while you prepare the grill. Get the grill to a medium-high heat. Place the prepared duck breasts onto the grill and close the lid. Cook for 6 to 8 minutes per side depending on how rare you like them. Remove from the grill when done and place onto a serving platter. Let rest for 10 minutes. Slice or serve whole. Serves 4
Note: If you don’t have a grill or can’t barbeque remember that whatever you can do on a grill you can do under an oven broiler or in a grill pan on top of a burner.

 A Few Words About Hamburgers
A delicious, juicy, tender hamburger can be yours, if you choose the right ground beef. The amount of fat directly contributes to the juiciness of the burger, so the leaner the beef, the drier the burger. Some markets state the cut of beef used for grinding while other indicate the percentage of fat in the grind. Some markets do both. Here are the three grinds that most shops carry:
Ground Sirloin
Ground sirloin has only 7 percent fat which makes it the leanest ground beef, but it can make a dense burger if overcooked. To combat dryness add 2 tablespoons of a wet condiment like teriyaki sauce, pesto, Dijon mustard, ketchup or mayonnaise for every pound of ground sirloin.
Ground Round
Ground round is a great choice for hamburgers because it has 15 percent fat.
Ground Chuck
Ground chuck is the ground beef of choice for many burger lovers. It has a relatively high fat content at 20 percent fat which makes a very juicy and very rich burger.
Ground Turkey or Ground Chicken
There are some people who prefer ground turkey or chicken for their burgers. Both must be cooked through so care must be taken to prevent dryness. Make sure to incorporate moisture by adding one of the ingredients suggested for ground sirloin. Also mix in 2 tablespoons of dried bread crumbs. As the meat heats and the fat melts the bread crumbs absorb and retain the fat that would otherwise drip out of the patty.
Shrinkage
Hamburgers shrink during cooking and a perfectly shaped raw patty can end up looking like a hockey puck. To avoid this, shape about 5 ounces of ground meat into a 4 inch round. Then make an indentation about 2 inches wide and 1 inch thick in the top. As the meat cooks the indentation will equalize the shrinkage.
No Don’t Do It!
Never Ever press on a hamburger to speed its cooking. You’ll squeeze out the precious fat and juices that make the burger taste so good. Yes, we’ve all done it…just resist that innate urge to do it again!


