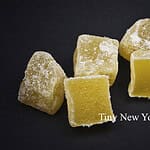
Crystallized ginger is fresh ginger that has been slowly cooked in sugar water and rolled in coarse sugar for preservation. It has a sweet, spicy taste and can easily be made at home.
“Work With What You Got!”
© Victoria Hart Glavin Tiny New York Kitchen © 2017 All Rights Reserved

There’s nothing like the smell of freshly brewed morning coffee whether it’s perked, dripped or pressed, it’s the most favorite part of my day. Coffee is my morning ritual, but coffee is not just for mornings. If you have a bit of extra brewed coffee or grounds lying around then you can “perk” up the flavor of pretty much anything. The earthy flavor works in everything from meat marinades, sweet syrups, and many savory and sweet recipes using coffee as an ingredient, from tangy sauces for a tender filet mignon to a few teaspoons flavoring your favorite cakes or cookies. When added to a chocolate cake or a cookie, coffee brings out the flavor especially in chocolate. When the recipe calls for water just use what’s leftover in the pot. In many recipes you can just add a teaspoon of instant coffee or even espresso powder.
Add flavor fast to a roast by using that leftover coffee in your marinade, which also helps tenderize the meat. You can also use it to the braising liquid for beef short ribs. As the liquid cooks down, the coffee caramelized adds a delicious bittersweet dimension to the dish. I also like to stir a bit of coffee into barbecue sauce for grilled chicken or add some to homemade chili to round out the flavor.
Add coffee grounds to your spice shelf! The combination of ground coffee, kosher salt, and paprika will add flavor to your dishes. Use it to make a crusted pork or brisket dish. Rub the coffee ground spice combination to burgers before grilling them.
I like using instant espresso powder in my desserts. Unlike coffee grounds, espresso powder dissolves completely in hot water, eliminating grittiness that you may not want in most baked goods. Keep in mind that it packs a powerful punch, so a little goes a long way. Add a small amount to brownies or cakes. Freeze it with sugar for an easy granita or reduce it with sugar and cream to create a rich glaze.
“Work With What You Got!”
© Victoria Hart Glavin Tiny New York Kitchen © 2017 All Rights Reserved

Figs are truly fantastic! Dried figs are available all year round and many markets offer luxuriously sweet fresh figs throughout the year as well. Figs are a healthy and portable snack that is packed with nutrition.
Figs are rich in potassium, which helps control blood pressure. They also provide calcium, magnesium, iron, and copper. Because they’re rich in fiber, figs support digestive health and may be helpful for managing a healthy weight. Figs are among the most alkaline foods and help balance the body’s pH.
Fresh figs are highly perishable, so they should be eaten a day or two after you purchase them. Look for figs that have a rich, deep color and are plump and tender, but not mushy. Wash them under cool water and remove the stem. Add fresh or dried figs to oatmeal, salads, cheese, and baked goods.
“Work With What You Got!”
© Victoria Hart Glavin Tiny New York Kitchen © 2017 All Rights Reserved
Love The Lumps!
Don’t use an electric mixer when combining wet and dry muffin ingredients. Beating will cause gluten to overdevelop, which will produce tough muffins. Mix just enough to wet the dry ingredients; a lumpy batter is the goal.

I love to bake all year long, but during the holidays I’m on “baking overdrive.” To make better cakes here are some simple tips to help you with the best outcome possible.
Don’t use cold eggs. The eggs really should be at room temperature, otherwise the mixture won’t emulsify properly. If you’re short on time place eggs in a bowl of warm water for 15 minutes.
Make sure to measure all ingredients precisely. Baking is an art form, but also a science.
Position pans as close to the center of the oven as possible. If you’re placing more than one pan in the oven, they should not touch each other or the oven walls. If your oven isn’t wide enough to put pans side by side, place them on different racks.
If a recipe calls for 1 cup of sifted flour, then first sift the flour and then measure it. If it calls for 1 cup flour sifted, measure the flour, then sift it. It may seem subtle, but it can make the difference between a light, fluffy cake and a heavy one.
Allow at least 20 minutes for your oven to preheat. It’s best to turn the oven on before you start working on your recipe.
Avoid opening the oven door. Opening the oven door too often can make a cake fall, so use the window in your oven door to check the cake’s process when possible.
Remember that each oven heats differently. Check for doneness 10 minutes before the recipe suggests. For most recipes, a cake is ready when it starts pulling away from the sides of the pan and a toothpick inserted in the center comes out clean.
Invest in wire cooling racks. Cakes cool faster and don’t get soggy when set out on a rack. Leave them in the pans for 10 to 15 minutes before unmolding, and then place on a rack to cool completely before frosting. Angel, chiffon and sponge cakes should be left in the pan to cool to prevent collapsing.
Unfrosted cakes can be stored, well wrapped in plastic, at room temperature for 24 hours. If storing unfrosted cakes for more than 24 hours, it is best to freeze them rather than refrigerate them. Wrap the layers in plastic wrap and then heavy-duty foil to freeze, let cake thaw in the refrigerator before frosting.
To store frosted cakes, keep at room temperature under a cake dome or large bowl unless the recipe specifies refrigeration.
For smooth and easy cake removal, prep your pans properly. When a recipe calls for greasing and flouring, place a piece of parchment or waxed paper on the bottom of a pan (trace and cut it to fit). Coat the sides and bottom with softened butter, and then dust with flour, turning the pan on its side to get full coverage and tapping out the excess. For chocolate cakes, swap in cocoa powder for flour.
Angel, chiffon, and sponge cakes should go into clean, untreated pans since they need to adhere to the sides in order to rise properly.
Happy Baking!
“Work With What You Got!”
© Victoria Hart Glavin Tiny New York Kitchen © 2016 All Rights Reserve

The Best Apples For Apple Pie
It’s apple pie season and it’s important to choose the best apples for apple pie. Choosing the right apples for baking can be a daunting task. I mean, seriously, there are over 7,5000 apple varieties. When it comes to pie not all apples are created equal. Choose a mix of firm & tart and firm & sweet varieties. Doing this adds diversity and depth of flavor, while holding their shape during the cooking process. No one wants a mushy pie.
Braeburn: A Firm & Sweet/Tart Variety Originating from New Zealand, Braeburn has a skin that’s muted red with golden-yellow undertones and tinges of faint green. It produces a firm, crisp bite and offers a pleasing balance between sweet and tart. Firm to the touch and great for baking as well as eating raw. Excellent when paired with Honeycrisp. Can be found in most supermarkets.
Granny Smith: A Firm & Tart Variety Classic green apple is firm, slightly sour, and perfect for pie making. It’s available everywhere.
Esopus Spitzenburg: A Firm & Tart Variety This is an heirloom variety that has flavors bright enough to make an excellent snack or pressed into cider. You’ll find this variety at farmers’ markets and makes a delicious pie filling.
Northern Spy: A Firm & Tart Variety Northern spy is thought to be the best apple variety for pies. Difficult to find at supermarkets, but many farmers’ markets have them.
Idared: A Firm & Tart Variety This tart and spicy apple is bright red in color when fully ripe. Not so easy to find in supermarkets, but popular at pick-your-own orchards and farmers’ markets.
Pink Pearl: A Firm & Tart Variety This variety is delicious and you’ll want to seek this variety out. Difficult to find, but can be found at some pick-your-own orchards. Search online in your area for a place to Pink Pearl.
Ginger Gold: A Firm & Sweet Variety Ginger Gold is a baker’s champion. This delicately sweet and crisp variety works well in pies, muffins, and cakes. Can be found in most supermarkets during autumn.
Golden Delicious: A Firm & Sweet Variety This is a mild tasting variety and is best when paired with heftier flavors. Very popular in the U.S. and can be found in any supermarket.
Honeycrisp: A Firm & Sweet Variety This is a crisp and predominately sweet variety. Very popular in the U.S. and can be found in most supermarkets. Great when paired with Braeburn for pie making.
Jazz: A Firm & Sweet Variety Great for eating raw as well as pie making. From New Zealand and can be found in most supermarkets.
Jonagold: A Firm & Sweet Variety A cross between Jonathan and Golden Delicious varieties. Sweet and tart flavor and can be used on its own. Can be found in both supermarkets and farmers’ markets.
Pink Lady: A Firm & Sweet Variety The perfect combination of sweet and sour. Pink Lady is excellent for baking as well as eating raw. Can be found in supermarkets and farmers’ markets.
A Word About McIntosh Apples: Mcintosh variety is a popular choice for many bakers, but I don’t recommend them on their own if you’re using them for pies. They just don’t hold up well to heat and tend to cook down into a sauce before the pie crust is done cooking. If you love the flavor of McIntosh apples and just have to use them in pies then combine them with a much firmer variety like Pink Lady, Jonagold, Honeycrisp, or Northern Spy.
“Work With What You Got!”
© Victoria Hart Glavin Tiny New York Kitchen © 2016 All Rights Reserved
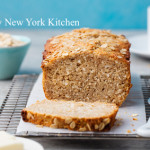
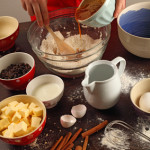
Quick Breads
For mouth-watering breads that don’t require a lot of time, turn to quick breads. By using baking powder, baking soda, steam, or air instead of yeast to leaven dough. An advantage of quick breads is their ability to be prepared quickly and reliably, without requiring time-consuming skilled labor and the climate control needed for traditional yeast breads. Quick breads include banana bread, beer bread, biscuits, cornbread, cookies, muffins, cakes, pancakes, brownies, scones, and soda bread.
Almost all quick breads have the same basic ingredients: Flour, leavening, eggs, fat (butter, margarine, shortening, or oil) and a liquid such as milk. Ingredients beyond these basics are added for variations of flavor and texture. The type of bread produced varies based predominantly on the method of mixing, the major flavoring, and the ratio of liquid in the batter. Some batters are thin enough to pour and others are thick enough to mold into lumps.
There are four main types of quick bread batter:
Pour Batters: Such as pancake batter, have a liquid to dry ration of about 1:1 and so pours in a steady stream – also called a “low-ratio” baked good.
Drop Batters: Such as cornbread and muffin batters, have a liquid to dry ratio of about 1:2.
Soft Doughs: Such as many chocolate chip cookie doughs, have a liquid to dry ratio of about 1:3. Soft doughs stick significantly to work surfaces.
Stiff Doughs: Such as pie crust and sugar cookie doughs, have a liquid to dry ratio of 1:8. Stiff doughs are easy to work in that they only minimally stick to work surfaces, including tools and hands – also called “high-ratio” baked goods.
Preparing a quick bread generally involves two mixing containers. On contains all dry ingredients (including chemical leavening agents or agent) and one contains all wet ingredients (possibly including liquid ingredients that are slightly acidic in order to initiate the leavening process). In some variations, the dry ingredients are in a bowl and the wet ingredients are heated sauces in a saucepan off-heat and cooled.
During the chemical leavening process, agents (one or more food-grade chemicals – usually a weak acid and a weak base) are added into the dough during mixing. These agents undergo a chemical reaction to produce carbon dioxide, which increases the baked good’s volume and produces a porous structure and lighter texture. Yeast breads often take hours to rise, and the resulting baked good’s texture can vary greatly based on external factors such as temperature and humidity. By contrast, breads made with chemical leavening agents are relatively uniform, reliable, and quick. Usually, the resulting baked good is softer and lighter than traditional yeast breads.
Chemical leavening agents include a weak base, such as baking soda (sodium bicarbonate) plus a weak acid, such as cream of tartar, lemon juice, or cultured buttermilk, to create an acid-base reaction that releases carbon dioxide. Quick bread leavened specifically with baking soda is often called “soda bread.” Baking powder contains both an acid and a base in dry powdered form, and simply needs a liquid medium in which to react. Other alternative leavening agents are egg whites mechanically beaten to form stiff peaks, as in the case of many waffle recipes, or steam, in the case of cream puffs.
There are three basic methods for making quick breads, which may combine the “rise” of the chemical leavener with advantageous “lift” from other ingredients.
The Stirring Method: Also known as the quick-bread method, blending method, or muffin method is used for pancakes, muffins, corn bread, dumplings, and fritters. This method calls for measurement of dry and wet ingredients separately, then quickly mixing the two. Often the wet ingredients include beaten eggs, which have trapped air that helps the product to rise. In these recipes, the fats are liquid, such as cooking oil. Using mixing is done using a tool with a wide head such as a spoon or spatula to prevent the dough from becoming over-beaten, which would break down the egg’s lift.
The Creaming Method: Frequently used for cake batters. The butter and sugar are “creamed” or beaten together until smooth and fluffy. Eggs and liquid flavorings are mixed in, and finally dry and liquid ingredients are added in. The creaming method combines rise gained from air bubbles in the creamed butter with the rise from the chemical leaveners. Gentle folding in of the final ingredients avoids destroying these air pockets.
The Shortening Method: Also known as the biscuit method, is used for biscuits and scones. This method cuts solid fat (whether lard, butter, or vegetable shortening) into flour and other dry ingredients using a food processor, pastry blender, or two hand-held forks. The layering from this process gives rise and adds flakiness as the fold of fat melts during baking. This technique is said to produce “shortened” cakes and breads, regardless of whether or not the chosen fat is vegetable shortening.
Quick bread originated in the United States at the end of the 18th century. Before the creation of quick bread, baked goods were leavened with either yeast or by mixing dough with eggs. The discovery of chemical leavening agents and their widespread military, commercial, and home utilization in the United States dates back to 1846 with the introduction of commercial baking soda in New York by Church and Dwight of “Arm & Hammer” fame. This development was extended in 1956 by the introduction of commercial baking powder in Massachusetts, although the best known form of baking powder is “Calumet”, which was first introduced in West Hammond and Hammond, Indiana (later Calumet City, Illinois) in 1889. Both forms of food-grade chemical leaveners are still being produced under their original names.
During the American Civil War (1861-1865) the demand for portable and quickly made food was high, while skilled labor for traditional bread making was scarce. This encouraged the adoption of bread, which was rapidly made and leavened with baking soda, instead of yeast. The shortage of chemical leaveners in the American South during the Civil War contributed to a food crisis.
As the Industrial Revolution accelerated, the marketing of mass-produced prepackaged foods was eased by the use of chemical leaveners, which could produce consistent products regardless of variations in source ingredients, time of year, geographical location, weather conditions, and many other factors that could cause problems with environmentally sensitive, temperamental yeast formulations. These factors were traded off against the loss of traditional yeast flavor, nutrition, and texture.
www.tinynewyorkkitchen.com
“Work With What You Got!”
© Victoria Hart Glavin Tiny New York Kitchen © 2016 All Rights Reserved
It’s Hotter Than Blazes Out Today And For Some Reason I’ve Been In The Mood To Make An Upside Down Peach Cake. Actually, I Lied. I Made Two!

Baking Cookies And Listening To The Whitstein Brothers With My Kitchen Door Open. Heaven!
“Work With What You Got!”
© Victoria Hart Glavin Tiny New York Kitchen © 2016 All Rights Reserved

Seafood
Keep your seafood fresh with safe handling and cooking tips.
Selecting Seafood
The first step in putting the best seafood on your plate is making sure that you put the best seafood in your shopping cart. Make the best choices at the store and you’ll enjoy great taste at the table every time.
When you’re shopping, make seafood the very last thing you pick up before you check out. Make sure to place it in an insulated bag for your trip home.
When purchasing clams and oysters in their shells, make sure they are alive. Shells of live clams and oysters may open naturally, but will close tightly when tapped, indicating that they are alive. Throw away any dead ones.
Fresh whole fish should have a shiny surface with tightly adhering scales, gills that are deep red or pink, free of slime, mucus and off-odor, and milk, briny aroma, similar to the ocean.
Fresh steaks, fillets, and loins should have a translucent look, fresh that is firm and not separating and a mild briny odor, similar to the ocean.
Handling Seafood
Shore to store is only one leg of the journey. It’s important to continue following safe handling recommendations once you take your seafood purchase home.
If your seafood is frozen make sure to thaw seafood in the refrigerator. Never thaw at room temperature.
Wash your hands with hot soapy water before and after handling raw seafood.
Thoroughly wash containers that held raw seafood before using them again.
Cooking Seafood
Now that your seafood is home safely, it’s time to get cooking.
Make sure that you cook fresh fillets and shellfish 1 to 2 days after purchasing.
Keep seafood refrigerated until it’s time to cook.
A general rule for baking and broiling fish is 10 minutes per inch of thickness at 400 to 450 degrees.
Fish is done when the flesh becomes opaque and flakes easily at the thickest part.
Scallops, clams, oysters, and shrimp become opaque and firm when fully cooked. Don’t overcook as this will result in loss of moisture, which affects texture and taste.
To boil, place shrimp and scallops in a large pot of boiling water (four cups of water per pound of meat) and simmer three to five minutes.
Broiled scallops and peeled and deveined shrimp will be cooked in 3 to 5 minutes.
Broiled shucked clams and oysters will be cooked in 3 to 5 minutes.
Oysters and clams should be steamed until their shells open completely. Throw away any that do not open.
Most seafood should be cooked to an internal temperature of 145 degrees. Consuming raw or undercooked seafood or shellfish may increase your risk of foodborne illness, especially if you have a medical condition.
“Work With What You Got!”
© Victoria Hart Glavin Tiny New York Kitchen © 2016 All Rights Reserved


