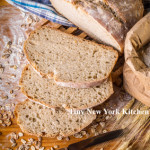
Many people are making bread these days and there’s nothing quite like the smell of bread baking in the house. Here are some answers to frequently asked bread making questions.
Never allow salt to come into direct contact with yeast because it removes the water that yeast needs to live. Instead, add salt to the flour used to make the dough, so the flour can act as a buffer.
A heavy-duty stand mixer is a great appliance for making bread dough. You can use the dough hook for mixing and kneading. If the dough isn’t coming together with the dough hook, switch over to the paddle attachment and mix just until the ingredients are combined, then switch back to the dough hook.
After the dough is mixed, let it rest. Professional bakers call this period, autolyze. It lets the flour fully hydrate and strengthens the gluten in the flour before kneading. Cover the work bowl with plastic and let the dough stand for 20 minutes and then knead on medium speed until the dough is smooth and elastic.
Dough made with a high proportion of whole-grain flour should feel tacky when you are kneading it. In general, moist or even sticky dough makes the best bread. Don’t add too much flour to the dough or the bread will bake up dry and tough.
How can you tell when the dough has been kneaded long enough? Use the windowpane test. Pull off a golf ball knob of dough and pat it into a rectangle. Pulling slowly and consistently from all four corners, stretch the dough into a thin, translucent membrane. If the dough tears easily, knead it longer. This technique won’t work with dough that includes seeds, nuts, or raisins, as they will tear the dough even if it has been kneaded sufficiently. If such ingredients have been used, check for stretchy and resilient dough.
Many bakers use a bowl to hold bread dough, but a straight-sided clear plastic tub is ideal for keeping track of dough as it rises. Mark the beginning level of the dough on the outside with a pen or a piece of tape, and then you can easily see when the dough has doubled. You can also use a glass bowl, but the doubling is a bit harder to define in a slope-sided container. Gently poke a finger into the dough. If the hole doesn’t refill, the dough has probably finished rising.
Many crusty artisanal are baked with steam to help keep the crust soft and pliable, allowing the bread to expand fully. Professional ovens have built-in steam injectors, but home bakers have to be more creative. One recommended method: When you turn on the oven to preheat it, place an empty heavy-duty rimmed baking sheet or pan on a rack near the top of the oven, When the bread dough is added to the oven, toss a handful of ice cubes into the pan and close the door. The ice will melt quickly and create a burst of steam. While the oven door is open, cover the glass on the door with a towel to catch any drips (the cold water could crack the glass) and remove the towel before closing the door.
A common way to test bread for doneness is to rap on the bottom of the loaf and listen for a dull thump. Using a thermometer is more reliable. Insert an instant-read thermometer in the bottom of the loaf, being sure to the tip reaches the center of the loaf. Butter and egg laden breads are finished when their internal temperature reaches 185 to 190 degrees F. Leaner and crispier breads are ready at 200 to 205 degrees F. For breads baked in loaf pans, insert the thermometer just above the rim of the pan, angling the tip down to the center of the loaf.
“Work With What You Got!”
©Tiny New York Kitchen © 2020 All Rights Reserve

Beer isn’t just for drinking. It’s also the secret ingredient in some of Tiny New York Kitchen’s favorite recipes, from stews to pasta sauce.
Depending on which brew you choose, you can add richness to stews and braises, a bright zing to sauces, and make baked goods extra tender and tasty. It’s great with chocolate. You can also pair it with your meals, just like wine, to make your dishes taste even better.
LAGER
Lager is the most popular beer for drinking. Smooth, light-bodied, and slightly floral, it goes with just about any dish, especially cheese. It’s also great to bake with. The bubbles in this beer add extra lightness and tenderness to all sorts of baked goods.
PILSNER
Clean, crisp, and slightly citrusy, this beer is refreshing on its own. Serve it with seafood or a simple tomato and basil pizza. Use it for quickly simmering shrimp because it won’t overwhelm the delicate, sweet flavor of the seafood.
STOUT
This rich dark beer has notes of coffee and caramel, great for sipping in colder weather. Pair it with heartier dishes like chili or steak and potatoes. In baking and cooking, stout makes chocolate cupcakes taste even more chocolaty and slow-cooked meats even richer.
AMBER ALE
You will know this beer by its reddish-brown color. It has a smooth, malty flavor that makes it a crowd-pleasing choice for your next party. Try this beer with grilled or roasted meats and barbecue. For cooking, it’s great in a glaze for pork or in a cheese sauce.
“Work With What You Got!”
©Tiny New York Kitchen © 2020 All Rights Reserved

Hungry for halibut or craving clams? There’s an easy way to prepare fish and seafood to perfections. Fish is ready when you can flake it easily with a fork. Shrimp and shellfish are done when they are opaque in color.
Bake: Best for fish fillets. Baking or roasting fish is an easy, hands-off method, especially good if you have a crowd to feed. As with any fish cooking technique, follow the recipe to avoid overcooking.
Wrap: Best for any fish fillet and shellfish. Cooking fish in foil is one of the most versatile ways to prepare fish, resulting in moist, flavor-packed dishes. And because you can load up on tasty ingredients, like herbs, citrus and spices, it’s a great way to cut back on fat and sodium without sacrificing flavor. Plus, cleanup is a breeze.
Poach: Best for any fish fillet and shellfish. Poaching simply means gently cooking the fish in liquid, such as water, broth, beer, or wine. It ads subtle flavor without drying out the fillets or adding any extra fat. To poach, simply cover the fish or seafood with liquid and bring to a simmer, just don’t let the liquid boil. You’ll only need a few minutes for your fish or seafood to be ready. You can also use the poaching liquid as a base for a sauce when you’re done.
Broil: Best for thick and meaty fish fillets, shrimp, and lobster tails. This method is especially good when you want to quickly bake fish and seafood. This is also a good method when you don’t have access to a grill or you’re adding a glaze. To make sure it doesn’t cook or brown too quickly, cook the fish at least 6 inches away from the broiler and watch carefully.
Steam: Best for clams and mussels. The traditional cooking method for clams and mussels, steaming is an easy way to add delicate flavor quickly without overcooking. Just add the seafood to a lidded saucepan with a little liquid like beer, wine, or broth, cover and bring to a simmer until the shells open up. Discard any that don’t open. You can also steam lobster, but it’s worth checking to see if your store’s fish department will steam lobsters for you.
Sear: Best for scallops, shrimp, and fish fillets. Use this cooking method for fish with a crisp, browned crust and a tender interior. Use a non-stick pan if possible and add a little oil before adding your fish, in batches if necessary, Don’t crowd the pan. Cook without stirring or turning for 2 to 3 minutes to brown the fish and crisp up any breading.
Grill: Best for any fish fillet or shellfish. Once grilling season rolls around don’t forget to add fish, shrimp, and even clams and mussels to your summer menus. Fish fillets take well to grilling and are easy to flip. Use a grilling basket for anything that might slip through the grate. Don’t forget skewers, which are the perfect way to grill shrimp.
“Work With What You Got!”
©Tiny New York Kitchen © 2020 All Rights Reserved

Some people are natural bakers and some people learn as they go. I’m guessing that most people are the “learn as you go” types. Here are some little things that, are not giant revelations, but are useful tips to help you through your holiday baking.
Unwrap Butter Before Bringing To Room Temperature
Many recipes call for softened butter and if you’re using it, here’s a trick. Instructions for softening butter usually directs one to leave the butter on the counter until it reaches room temperature. It’s much better to unwrap the butter straight from the refrigerator and let it soften in the mixing bowl. When butter is cold, it lifts cleanly off the wrapper as opposed to much of it sticking to the paper and the mess it makes.
Use Butter Paper To Grease Pans
If you don’t unwrap your butter when cold and you have butter-globbed butter wrappers, use them to grease pans.
Use A Large Slotted Spoon To Separate Eggs
For separating eggs, break the whole egg into a small-size bowl. Grab the yolk with a metal slotted spoon. Use the wall of the bowl to help and let the white slink off the edge of the spoon, jiggling if the white is stubborn. The white doesn’t actually go through the wholes of the spoon, but the holes somehow seem to facilitate their departure. Do one at a time and transfer each one after so as not to taint the batch should a yolk break. If you are using just the whites and don’t need the yolks right away, stick them in the freezer for later use.
Use The Right Kind Of Measuring Cup
Use spouted cups for the measuring of wet ingredients. Use the scoop/cup type for dry ingredients. It’s hard to get an accurate amount of flour or sugar in a big glass measuring cup, and it’s hard not to spill oil or water when it’s filled to the brim in a scoop measuring cup. For wet ingredients, get to the eye level with the quantity marks and make sure they are even. For dry ingredients, spoon ingredients into the cup and then level it off with a knife.
Better Yet, Use A Scale
Unlike the rest of the world, American recipes use cups for measuring. Baking can be an exact science and as long as the recipe includes weights the scale is the most accurate way to measure.
Don’t Measure Over The Bowl
If you measure your ingredients over the bowl you just may get more in the bowl than you intended. Measure to the side of the bowl, even if it means having to wipe up a few grains of salt from the counter.
Know Your Oven’s Moods
Each oven heats differently. Ovens have hot and cool spots, which might explain uneven baking. Get into the habit of moving shelves around (middle rack is a good bet) and setting a timer to rotate pans halfway through baking. Test your oven by turning your oven to 350 F degrees, line the racks with slices of white bread and cook until they start to toast; remove them and analyze the results for a pattern. Are they even? Are the ones from the back darker than the rest?
Use An Oven Thermometer
Your oven dial may not be giving you an accurate read. The best way to avoid this is by purchasing an oven thermometer that sits inside the oven. Many bakers do this and having the ability to monitor the temperature in real-time allows you to adjust as needed.
Candy Thermometers
All candy thermometers are not created equally. Here’s how to calibrate your candy thermometer: Put the candy thermometer in a pot of water and bring it to a rolling boil, with constant and vigorous bubbles. The boiling point for water is 212 F (100 C), which is what your thermometer should read (if you are at sea level). You can leave it in there for a few minutes to make sure the reading is accurate.
Dark And Light Pans Are Not Perfectly Interchangeable
Are your cookies always overdone on the bottom? Are your roasted vegetables not getting browned enough? This one makes perfect sense. Dark pans absorb heat, light pans reflect it. Use light pans for cookies and cakes that don’t want a brown crust. Use dark pans for roasting vegetables, making pizza, or baking anything in which you want more of a crust.
Swapping Pan Sizes And Shapes
You might now want to use the pan that the recipe calls for. Pick up a copy of, Joy of Baking, and use the Baking Pan Sizes page. It has a list of every pan and its capacity, so that you can switch things around and swap pans with compatible capacities or adjust if needed.
Wear An Apron
Your apron will take a beating, but it will save your clothes!
“Work With What You Got!”
©Tiny New York Kitchen © 2019 All Rights Reserved

This holiday season make these little no-fry doughnuts. They are an easy to make treat that can be enjoyed for breakfast or dessert.

Turn out amazing treats with these easy tips and tricks to help you bake your best every time.
Measure Flour Accurately
Using a measuring cup to scoop directly from the bag can pack in too much flour, leading to dry, dense baked goods. Use the “spoon and sweep” method by gently stirring the flour in the bag with a spoon. Spoon the flour into your measuring cup. With the back of a knife, level off the cup and sweep the excess back into the bag.
Warm Eggs To Room Temperature
Room temperature eggs blend more easily in batter and dough, and whites whip up with bigger volume. Take eggs out of the refrigerator a couple hours before baking or add cold eggs to a large-size bowl. Cover with warm, not hot, tap water. Rest for 5 to 7 minutes while you measure other ingredients.
Test Your Baking Soda And Baking Powder
These leaveners help baked goods rise. If they aren’t active, quick breads and pancakes will be flat instead of fluffy. Spoon baking powder and baking soda into separate small bowls. Pour boiling water into baking powder. Pour distilled white vinegar into baking soda. If the ingredients fizz, they’re still active.
Measure Liquid And Dry Ingredients Separately
Too much or too little liquid can change the texture and taste of the finished recipe. Liquid measuring cups give you room to pour right up to the fill line without spilling. Use clear measuring cups with pour spouts for liquids. Use flat-bottomed measuring cups for dry ingredients and use the “spoon and sweep method.”
Prevent Overbaking
Know your oven’s quirks. All ovens run slightly differently, and some spots are hotter than others. Keep an eye on how your baked goods are browning, the temperature, and the time to make the best estimate. Use an oven thermometer to see if your oven runs hot or cold (a few degrees above or below what the dial says), and adjust accordingly. Set a kitchen timer, and check for doneness a few minutes early. Rotate your pan halfway through for even baking.
“Work With What You Got!”
©Tiny New York Kitchen © 2019 All Rights Reserved

The fall season is a mixture of hot and cool, leaves changing and schedules becoming more structured. Whether you’re watching your child’s soccer game, taking a long weekend drive through winding roads saturated with fresh foliage or baking up the bounty of the season – take a moment to enjoy every phase the season has to offer.
“Work With What You Got!”
©Tiny New York Kitchen © 2019 All Rights Reserved

Cupcakes are an adaptable fun treat that makes any occasion special.
“Work With What You Got!”
©Tiny New York Kitchen © 2019 All Rights Reserved
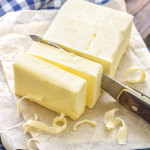
Salted & Unsalted Butter
Butter comes either salted or unsalted (also called sweet). Although all salted butter contains some amount of salt (salt used to be added as a preservative, but today it’s added primarily for flavor), some salted butters are noticeably salty. The problem is the word some. Since the amount of slat can vary from butter to butter, it’s best to use unsalted butter in kitchen and add as much salt as you’d like to each dish. If you prefer salted butter, use it – just remember to adjust the salt in each dish.
Cultured Butter
With this kind of butter, the cream is treated with cultures (like yogurt), allowed to ferment and then churned. The result is a fuller flavor with noticeable acidity. It’s easier to find cultured American butters these days, but as with salted butter, not all cultured butters are the same. A favorite, made by Vermont Creamery, has tang and produces a different sensation on one’s tongue due to its very high butterfat content. Cultured butter is very good to use in baking.
European Butter
The standards for the minimum amount of butterfat in butter are different in Europe and America. Abroad, the minimum is 82 percent; in America it’s 80 percent; everywhere it’s lower for salted butter. When you use European butter you’re likely to have a much richer dish. When I use European butter I don’t make any adjustments to my recipes to make allowances for the difference in butterfat.
Room Temperature Butter
Proper room temperature butter is still slightly cool; it’s really more about texture than temperature. The butter should be soft, but not squishy. The stick should hold it’s shape (a little pressure should leave an indentation), and it should be pliable – if you smash it with a spatula, you shouldn’t have to fight it.
Storing Butter
Keep butter in the refrigerator, well wrapped and away from foods with strong odors. It can be kept in the freezer for almost forever, but let’s call it a year. Defrost overnight in the refrigerator. Butter can keep out at cold room temperature for a day in a butter bell or crock. However, store butter in the refrigerator and then pull it out about 20 minutes before using it.
Clarified Butter
Clarified butter is a magical thing. It’s butter without water (you simmer it away) that won’t burn when used over a high heat. To clarify butter, place the butter in a saucepan, bring it to a simmer, let it bubble gently until it’s covered with foam. Keep simmering the butter until the foam sinks to the bottom and the bubbling just about stops. Line a fine-mesh sieve with cheesecloth or a coffee filter, pour the butter through it into a container, cool and cover. The butter will keep in the fridge for at least 2 months.
“Work With What You Got!”
©Tiny New York Kitchen © 2019 All Rights Reserved
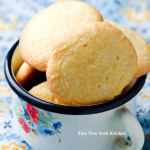
If you’re looking for some useful tips on making and baking the best cookies you and your family has ever tasted then these basics will get you on the right path for cookie success.
Butter
It’s true that nothing is better for the flavor, richness, texture, and color of cookies than butter. If you have a dairy allergy then margarine can be substituted for butter if it contains enough fat. For best results, choose a stick margarine with at least 80 percent vegetable oil or one that contains at least 100 calories per tablespoon. Substituting shortening for butter will give cookies a softer, more cakelike texture and a different flavor.
Sheet Success
If your cookie sheets are thin, warped, or dark from years of baked-on grease, it’s time to go shopping. Purchase shiny, heavy-gauge cookie sheets that have low or no sides. Use jelly-roll pans (15x10x1 inch baking pans) only for bar cookies since their 1-inch sides prevent other cookie types from browning properly. Let hot cookie sheets cool between batches. Using a nonstick baking mat prevents cookies from sticking to cookie sheets by lining the sheets with this reusable mat. Parchment paper works well, too.
To The Freezer
Are you concerned you’ll have no time for last-minute holiday cooking baking? Get a head start by freezing baked and cooled cookies. Most cookies can be frozen for month, ready to be pulled out at a moment’s notice. Use airtight plastic bags and containers specifically labeled for freezer storage. Separate layers of cookies with sheets of waxed paper. Tightly seal filled bags and containers and freeze for up to three months. For best results, don’t frost or glaze cookies before freezing. Instead, freeze unfrosted cookies, thaw, then frost before serving. Most cookie dough (except bar batters and meringue or macaroon mixtures) can be frozen in an airtight freezer container for up to six months. Thaw dough in its container in the refrigerator. Shape and bake as directed.
Shipping
Sending cookies, not crumbs, to loved ones through the mail is possible – with a little care. For best results, send crisp or firm varieties (including most slice & bake) and avoid frosted moist, thin, or filled types. Wrap baked and cooled cookies individually, in back to back pairs, or in stacks in plastic wrap. Line a sturdy box with bubble wrap and pack cookies in layers of packing, peanuts or tissue paper so they won’t have room to shift. Write “perishable” on the box and ship early in the week so your package won’t be delayed over the weekend.
“Work With What You Got!”
©Tiny New York Kitchen © 2018 All Rights Reserved


